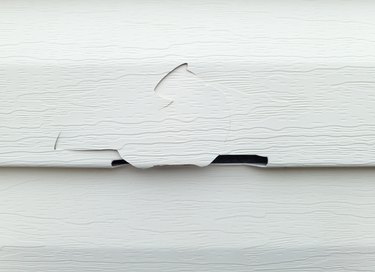
While fiber-cement is one of the most durable exterior siding materials, it can still crack on occasion. Sometimes cracks are caused by incorrect siding installation. Other times, cracks crop up due to exposure to the elements. You may be able to fix small cracks yourself, which will save you the time and money involved with hiring a pro.
Things You'll Need
Video of the Day
How to Repair Cracks in Fiber-Cement Siding
Step 1: Inspect the Damage
Take a close look at your damaged fiber-cement siding. If a single board has a small crack just a few inches in length, you can tackle this project yourself. However, larger cracks, gaps, warping, and other damage warrants a call to a professional for help. Trying to repair significant damage yourself may worsen the problem and leave you with a hefty bill to replace all of your siding.
Video of the Day
Step 2: Clean the Siding
Before sealing the crack in the fiber-cement siding, clean it to get rid of all dirt and debris. Spray the siding down with a garden hose and use a soft-bristle scrub brush to help loosen the dirt if needed. Work in small sections from left to right and top to bottom to break the job up and to prevent visible streaking and dripping onto the clean siding.
Step 3: Mix the Patching Compound
Follow the manufacturer's instructions on the packaging of your cementitious patching compound, mixing it with water in a bucket using a stir stick or a stiff brush. Thin the compound out enough so that you can manipulate it somewhat, but make sure it's still viscous enough to stay put without dripping or spreading. Scoop some of the compound up with your putty knife and hold it upside down. If it drips off the knife, you need more compound to firm it up. If it stays put, it's good to go.
Step 4: Apply the Patching Compound to the Crack
Spread the patching compound into the crack using a putty knife. Fill the crack completely and scrape off any excess with your putty knife so that it's smooth and level with the surface of the siding.
Step 5: Let the Compound Set
Once you've applied the patching compound and smoothed it out, let it sit for at least a few hours to allow it to harden in the crack. Read your product's packaging for specific curing times. Typically, the longer you let it cure, the better. If possible, let it set overnight.
Step 6: Paint the Siding
Grab a bucket of paint and a paint brush and get to work painting over the filled crack. Make sure the paint color you use matches the rest of your siding (unless you're repainting all of it with a new color). Only use paint specifically formulated for exteriors. The paint will take a day or two to completely dry, so avoid touching the area until then.