Bath fans are needed in bathrooms to exhaust warm, humid air, preventing mold and rot. Some bathrooms have suspended ceilings in lieu of drywall ceilings. Suspended ceilings actually make installation of a bath fan easier because you can remove various ceiling panels to install the fan and run the ductwork. In bathrooms with drywall ceilings, you have to climb into an attic to do a lot of the work, and some attics can be cramped for space.
Measure and Cut Ceiling Tile
Video of the Day
Step 1: Measure the Fan Housing
Measure the dimensions of the fan housing. Lay out these measurements on the ceiling tile in the location you want to mount your fan.
Video of the Day
Step 2: Cut the Ceiling Tile
Cut out the square you marked on the ceiling tile with your drywall saw. Use gentle, slow strokes to prevent cracking or ripping the tile.
Step 3: Ensure the Fan Fits
Place the cut-out tile in the ceiling and remove the tile next to it. Check to see that the bath fan fits through the cut hole in the tile from above. Set the fan aside for now.
Support and Install Fan
Step 1: Install Support Wires
Install four ceiling wires from the ceiling joists down to where the fan will be located. Install them in the same fashion as the ceiling wires that hold up your suspended ceiling. Leave them long for now; you will trim them later. Alternatively, your fan may come with suspension brackets that can be screwed into ceiling joists.
Step 2: Attach Wires to Mounting Brackets
Hook the wires into the mounting brackets on the fan. There should be one bracket on each corner of the fan. Let the fan slide into the hole in the ceiling tile until the bottom of the fan is flush with the bottom of the suspended ceiling. Twist the wires tight and cut the excess off.
Step 3: Wire Fan to Electrical Circuit
Open the electrical panel on the fan. With the appropriate breaker switch turned off, wire the fan into your bathroom's electrical circuit. Follow local code on how to wire the fan and what type of materials to use. Each municipality varies on this. Call an electrician to perform this step if you are not experienced with wiring and electrical safety protocols.
Prepare to Vent Exhaust Fan
Step 1: Drill Interior Pilot Hole
Drill a 1/4-inch pilot hole from the inside out at the location where you are venting the fan out of the home, which should be as close to the fan as possible with minimal turns.
Step 2: Drill Exterior Pilot Hole
Go outside and drill a 4 1/4-inch hole through the wall with the pilot hole as your center.
Step 3: Install Exhaust Vent Hood
Install the exhaust vent hood on the outside wall. The stub of pipe will slide through the hole in the wall. Secure the vent hood to the wall with exterior wood screws. Be sure to seal the vent hood from weather with caulk suitable for outdoor use.
Measure and Install Vent Duct
Step 1: Measure Distance for Vent Duct
Go inside and measure the distance between the vent outlet on the fan and the pipe stub. Add about 12 inches to this to allow for sagging and slight bends.
Step 2: Cut the Ductwork to Size
Cut the flexible ductwork with your utility knife and cut the reinforcement wire in the duct with your wire cutter.
Step 3: Secure the Vent Ductwork
Slide 4-inch clamps over each end of the flexible ductwork. Slide one end over the vent outlet of the fan and tighten the clamp so it clamps the ductwork down to the vent outlet. Repeat this process for the pipe stub of the vent hood.
Finish Up the Installation Process
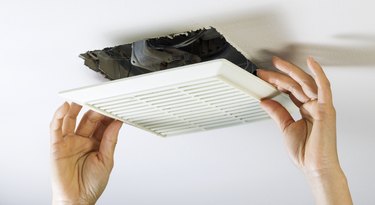
Step 1: Attach Fan Grille
Snap the exhaust fan grille over the bottom of the exhaust fan. Most grilles have a spring-tensioned wire that you squeeze together, slide it into a slot and push it up, and it will snap into place.
Step 2: Reinstall Ceiling Tiles
Replace all the ceiling tiles that you removed.