Bostitch is a long-trusted maker of quality staplers, and its products range from office workhorse staplers to heavy-duty construction staple guns and nail guns. They open in a variety of ways, but once you figure out where the stapler drawer is, that's half the battle. Of all its products, the one you've probably seen around most often is the spring-powered office stapler, which is a cinch to open and reload.
The Spring-Loaded Stapler
Video of the Day
With its trademarked "PaperPro" technology, Bostitch makes it possible to staple up to 28 pages of regular-weight paper with the push of a finger. Whether you're trying to reduce repetitive strain or you're just tired of grunting when stapling documents, the Bostitch PaperPro line has become a popular office workhorse for its ease of use.
Video of the Day
The line of staplers has other conveniences, with some staplers that can be stored standing up as well as lying down. Teachers love them for the way they open for bulletin board posting. The staplers also boast a mechanism to prevent staple jams when used with the right staples for that model. And some staplers even have built-in storage for additional racks of staples.
Opening and Loading Bostitch Staplers
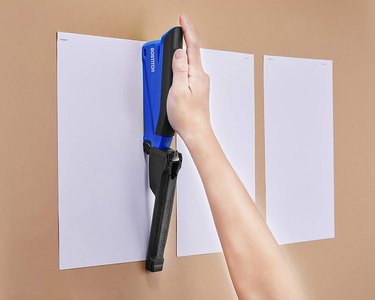
If you have flyers to post around town or bulletins to whack up down at the community center, then opening a Bostitch stapler is easy — simply pull the stapler open.
Step 1: Open the Stapler
These are bottom-loading staplers, so turn your stapler upside down and pull the bottom up and away, and it should open to 180 degrees plus. Once open, you'll have exposed the belly of the beast, and either you're looking at an empty staple drawer or you're looking at staples.
Tip
Despite the many styles of Bostitch desk staplers, the process is quite similar for most models.
Step 2: Open the Staple Drawer
If you're not banging up notices onto corkboards, you're probably in need of a fresh rack of staples. To replace the staples, simply open the drawer. To do so, there's a black tab to the rear of the staple drawer, which is located just above the central hinge. Pull the drawer back so the drawer's spring-loaded lock slides out.
Step 3: Load the Staples
Loading the drawer or magazine is easy as can be. With the stapler open, drop a stick of staples into the magazine with the flat side facing down and the pointy teeth facing up. Essentially, once you close it, you press down the top, and the pointy teeth drive through the paper before folding over to hold it in place; so the teeth face out from the magazine.
Step 4: Close the Stapler
Slide the drawer's cover back in place, pushing straight in firmly until it locks. Clasping firmly with both hands, close the stapler as if you are closing a book. The stapler is ready to go.