
Making models serves double purpose by letting students interact with the information and helping teachers evaluate student understanding. Skin may seem straightforward when viewed from the outside, but skin complexity is more than, well, skin-deep. Building a 3D skin model with labels will help understand skin's complex structure.
The Importance of Skin
Skin forms the largest and fastest growing organ in the human body. Also called the integumentary system, skin works to maintain body temperature while protecting the underlying body systems from dirt and microbes. Skin separates the insides from the outside, and vice versa.
Read more about the life span of skin cells.
Basic Skin Structure
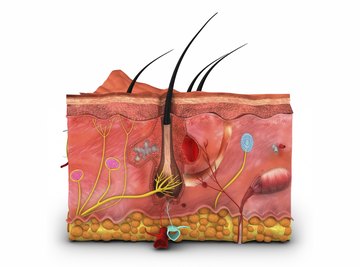
The epidermis is the top, outer layer of skin. This layer of skin varies in thickness from very thin (eyelids) to very thick (heels). The epidermis forms new cells at its base, which move upward and flake off about a month after they form. The epidermis makes melanin, the pigment that determines skin color. Special cells in the epidermis also serve as part of the immune system by protecting the body from invading microbes.
The dermis lies under the epidermis. The dermis contains many specialized structures. Within the dermis lie sweat glands, oil (sebaceous) glands, nerve endings, hair follicles and blood vessels.
Below the dermis lies the hypodermis, a subcutaneous fat layer. This fat layer attaches the dermis to the underlying layers of bone and muscle. The fat layer helps protect the underlying body from bumps and scrapes while providing an insulating layer to help maintain body temperature. The blood vessels and nerves that reach into the dermis travel through the hypodermis.
Read more about how skin regenerates.
3D Skin Model Ideas for Materials
Several material choices could be used to complete the layers of the skin project.
Edible projects could use three different color or flavor layers of cookie or cake, gelatin or crackers and cookie crumbs. Use licorice or other long thin candy in different colors to create the hairs, nerves and blood vessels. Use small candies or fruits to represent the glands.
Nonperishable materials like modeling clay or salt dough can be used to create a cross section of skin. Use pipe cleaners to represent hair and different clay colors to mold the hair follicle and other structures. If using salt dough, use food coloring to differentiate the cell parts. (See Resources for Salt Dough recipe)
Building a Cross Section of Skin with Clay
Begin by selecting three colors of clay or salt dough. The epidermis will be thinnest and the hypodermis the thickest with the dermis about half as thick as the hypodermis and twice as thick as the epidermis. The ratio epidermis:dermis:hypodermis would be 1:2:4, so the model could have one inch representing epidermis, two inches representing dermis and four inches representing hypodermis. To make the model free-standing, either make the hypodermis wider than the other layers or make the whole block three to four inches wide.
The outer layer, the epidermis, contains at least 10 to 15 layers of cells. Either score the edges and top to suggest these layers or, if time is available, create enough small flat wafers to build the epidermis layers. About 5% (one out of every 20 cells) produces melanin, so color or mix colors to create a few of these special cells to place in the lower layer of the epidermis.
The dermis contains the hair follicles, oil and sweat glands, nerve endings and tiny blood vessels. For the hair and its follicle, carve or form a channel from the lower part of the dermis through to the surface of the epidermis. Make an onion-like structure by wrapping a ball of clay around the bottom of a pipe cleaner. Fit the follicle, the clay end, at the bottom edge of the dermis, extending the pipe cleaner hair up through the channel and out the top of the epidermis.
Use small balls of clay to make oil glands and connect the oil gland to the hair channel with a small groove. Sweat glands look like small coiled worms with their own channel to the surface of the epidermis.
The blood vessels and nerves enter the dermis from the hypodermis below the dermis. Roll thin spaghetti-like tubes of different colors to represent the nerves and blood vessels. Each hair follicle will have a nerve and blood cell attached. Otherwise, the nerves extend to near the bottom of the epidermis and the blood vessels loop up to near the bottom of the epidermis and then back down into the hypodermis.
The hypodermis or subcutaneous fat layer contains bulbous or rounded fat. Sculpt or form small marble sized balls of clay to represent the fat. Connect the nerves and blood vessels from the dermis to larger matching tubes running beneath the dermis in the hypodermis.
Complete the 3D skin model project by labeling the parts or creating a key to explain what each part of the model represents.
References
Tips
- Mount your model by gluing it to a sturdy piece of cardboard. At the base of the model, write a description of each of the layers of skin, their function and features.
Warnings
- Do not use a hot glue gun for this project as it may melt the foam or sponge.
About the Author
Karen earned her Bachelor of Science in geology. She worked as a geologist for ten years before returning to school to earn her multiple subject teaching credential. Karen taught middle school science for over two decades, earning her Master of Arts in Science Education (emphasis in 5-12 geosciences) along the way. Karen now designs and teaches science and STEAM classes.
Photo Credits
7activestudio/iStock/Getty Images