
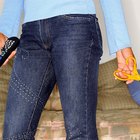
Upcycle a pair of old denim jeans by transforming the style with fashion trims. Use your imagination to decorate these bottoms with appliqués, heatseal patches and border taping. Since trim styles vary, look at the backside of the embellishment to ensure you have the necessary application tools. Backsides that do not have factory-applied adhesives require extra application steps, which often include adding stabilizer sheets as well as hand or machine stitching.
Rhinestone Patch Applique
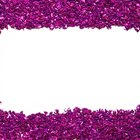
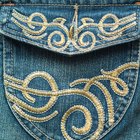
Add a little glitz and glam to your jeans with a rhinestone patch appliqué. Fabric and sewing shops carry a variety of pre-made patches -- from flowers to skulls. Take time to measure the width and length of the area you want to decorate. Make sure that the trim doesn't butt against the waistband's shank-button closure or extend over pocket rivets. Apply the trim with a glue applicator syringe. Pour the glue into the backside of the syringe, turn the patch backside facing up, push the plunger into the syringe and add the adhesive to the center -- quarter or dime size depending on the patch size. Finish applying a thin strip of adhesive around the border, approximately 3/8 inch from the edge, to prevent glue from seeping out. Press the patch against the jean and allow to dry according to your brand's recommendation.
Crochet Lace
Whether you choose a freestanding crochet-lace appliqué -- decorative lace trim surrounded with a crochet border edging -- or edging, this trim completely changes the vibe of a basic jean style. Spray a protective coating of spray starch over the lace to stabilize the delicate trim. If you're working with one trim for each leg, pin with dressmaker pins to ensure both sides are evenly placed. Attach the trim with a sewing machine or hand-stitches. If you machine stitch, use matching cotton-covered polyester thread, which has natural elasticity for movement. Machine stitch at a slow speed, using a narrow-length zigzag stitch to sew the inner edge of the crochet edging as well as the edge of the lace.
Heatseal
Whether you use sports-driven patches or decorative butterflies and flowers, heatseals add instant color to any pair of stone-washed jeans. Create your own border with mini flower heatseals or decorate one leg with animal trims. Since heatseal surfaces vary, cover the trim with a protective sheet to avoid damage during application. Heat your iron to a cotton setting and glide the iron in a back-and-forth motion over the protective sheet several times until the heat-backing adhesive releases on the denim cloth. Carefully lift the protective cover after several passes with the iron to check if the patch has adhered. Repeat as needed until the heatseal is attached.
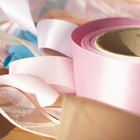
Border Tape
Decorative border taping is available in rich brocades as well as beaded finishes with stones and shells -- they can make your old jeans look like you spent a fortune. Measure the leg-cuff opening with a flexible tape measure -- generally 20 inches for a women's size 10 -- and add a ¼ inch to each end of the border taping trim, making the finished taping length 20 ½ inches. If you're working with a thick brocade or beaded strip, place the taping on a cutting mat and score the end with a craft knife prior to cutting with fabric scissors. Pin the two backside ends of the taping and machine stitch together. Pin the border along the leg-cuff opening and machine stitch at a slow speed along the top edge of the taping. Stitch the taping along the bottom edge before wearing your decorated jeans.
Related Articles

Sheath vs. Shift Dresses
How to Sew a Ribbon to a Dress Without ...

How to Use Fabric Tape to Tailor Clothes

How to Distress the Bottoms of Jeans

How to Make an Edge for a Bridal Veil
How to Make Your Own Bulletin Board ...

How to Alter the Length of a Leather ...
How to Stop Satin from Fraying
How to Get the Stiffness Out of ...

How to Narrow Wide Pants
How to Hem a Sequin Dress
How to Glue Rhinestones on Jeans

How to Make Japanese School Uniforms

How to Cut a V-Neck on a Hoodie

How to Dress When You Have No Butt

How to Attach Cub Scout Patches

How to Make Chaps Out of Pants
How to Print on Denim

Is There Anything to Use to Make a ...

How to Cut Feet Off Tights
References
Writer Bio
Mercedes Valladares is the founder of M721Organics and has been an independent designer for over 15 years. Her work experience commenced during college with manufacturers based in New York and Hong Kong. Her education includes LIM College, International Fine Arts College and design certification from the Paris Fashion Institute. She produces eco-crafting videos and writes recycling articles online.
Photo Credits
Comstock/Comstock/Getty Images