Does your toilet squeal, screech or hiss as it's filling, or do you find it difficult to adjust the water level to stop the toilet from running? You can make things right by replacing the toilet pump, better known as the fill valve.
It isn't an expensive or difficult proposition to replace a toilet fill valve. New ones cost less than $15, and the procedure is one that virtually anyone can accomplish. The only tool you'll need is a pair of locking pliers.
Video of the Day
Video of the Day
Which Component Is the Toilet Pump?
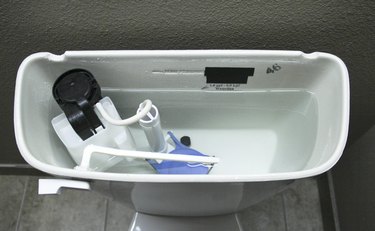
If you look inside a conventional toilet, which is one without a pressure-assist valve, you'll see the flapper or canister that blocks the siphon hole at the bottom of the tank. It's connected to an overflow tube and to the flush handle by a chain. Together, these components comprise the toilet flush valve.
The other tube that extends vertically along the wall of the tank is the toilet pump, or fill valve. It's connected to a ball float on the end of a 2-foot arm or to a cup-style float that rides up and down along the valve tube. The latter is a newer design, and it's the one most available at hardware stores.
The cup-style fill valve, first introduced by Fluidmaster, is superior to the older ballcock-style valves and is the one you should use. It takes up less space in the tank and has fewer parts that wear out. However, if you decide to go with a ballcock valve, the installation procedure is pretty much the same.
How to Replace the Toilet Fill Valve
Before you start the replacement procedure, it's always a good idea to read the instructions. You should also make sure all the parts that are supposed to be in the box are there. People often open boxes in the store, and it's not unusual for something to fall out.
- Turn off the water and drain the tank. Use a sponge or turkey baster to transfer all the water into the bowl.
- Disconnect the tube connecting the fill valve to the overflow tube. If you're removing a ballcock valve, unscrew and remove the float arm.
- Unscrew the water supply hose from the connector on the bottom of the tank. Note the nut just above this connection, Loosen this nut and remove it, and you'll be able to lift the fill valve out of the tank.
- Measure the height of the tank, remove the fill valve from the box and adjust it to the correct height. Follow the manufacturer's instructions when doing this. The top of the valve should be as close as possible to the top of the tank.
- Slide the rubber washer that came with the valve onto the threaded connector, insert the connector in the hole in the tank and screw on the nut. Hold the valve steady while you tighten the nut with pliers.
- Connect the fill valve to the overflow tube with the small length of tubing provided.
- Reconnect the water and turn it on.
Adjust the Float
The float determines the water level in the tank, and you want the level to be about an inch below the top of the overflow tube. There may be a reference line on the tube.
If you installed a Fluidmaster valve, you adjust the float by turning the screw on the top of the connecting rod.
Adjust a ballcock float by rotating it so the bend in the arm is facing up or down as needed. You can also adjust the length of the float arm by screwing or unscrewing the ball.