
Creating wedding invitations could be an enjoyable experience that brings a couple together during wedding planning. With most of society having easy access to the Internet, there is no longer one method of creating an invitation. Couples may choose to create digital e-cards, mail out formal invitations on fine paper, or have guests RSVP on the couple's website. Many couples today choose all three. Whatever the medium, several key elements must remain when using a Mac computer to create an invitation.
Use the Desired Mac Program
Using a Mac to create wedding invitations is not much different than using any PC. Most programs today, Microsoft Word being the most popular, are compatible on both Mac and other operating systems. After opening up Microsoft Word, for example, most couples use a pre-made template to create an invitation. Choose a template that you can modify to match the wedding theme.
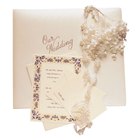
Choose how many invitations need to be created based on the guest list. Once this is figured out, make sure to purchase high-quality printer paper. Ivory is the most popular choice for weddings, while some choose to a paper with a unique design, like a beach setting. The design should reflect the theme of the wedding. Be careful though, suggest many wedding designers, because a wedding invitation conveys a certain tone to the guests. A traditional white design with calligraphy style stenciled names conveys a far more formal tone than a beach setting and a margarita glass.
Design the invitation with accent colors that match the linens that will be at the wedding, or stick with a white background.
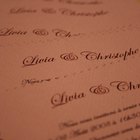
Center the margins for all of the writing. The formal names, including surnames, of the bride's parents should be at the top. State that they are requesting the invitee's presence at the marriage of their daughter. Underneath this should be, in larger font, the bride's name. Go down a space and write "to." Then, go down another space and enter the groom's name. Underneath this, write "son of." Go down one more space and write the formal names, including surnames, of the groom's parents.
Place wedding information at the bottom. Most often at the bottom of an invitation, couples choose to place the date, time and place of both the wedding and wedding reception. Write out all numbers. Instead of "Sunday, the 10th of June" write "Sunday, the Tenth of June."
Include RSVP information at the bottom of the invitation. This is also where you could place the wedding website URL. Most websites now have a section where invitees can easily RSVP for the wedding by filling out a simple digital form and clicking "Submit."
Related Articles

How Do I RSVP on TheKnot.Com?

Etiquette for Save the Date Envelopes

How to Write a Newspaper Engagement ...

The Standard Size for Wedding ...
Wording Etiquette for Wedding Seating ...

How to Create Maps for Wedding ...

How to Word an Invitation for a Female ...

How to Write a Wedding Invitation

Proper Etiquette for Names on Place ...

How to Send Birthday Wishes on Facebook

Etiquette of Listing the Deceased ...

Wedding Etiquette for Name Order
How to Print Wedding Enclosure Cards

Proper Way to Address a Party ...
How to Address Place Cards for Weddings

Invitations to Make & Print at Home for ...

How to Create an Email RSVP for a Party

How to Address Informal Wedding ...

How to Invite Friends for a Casual Lunch
Crafts to Make With a Wedding Invitation
References
Writer Bio
I have served as a triathlon coach, personal trainer, and nutrition counselor. In 2011, I started my own company, Tri-Fi Health and Wellness, which caters towards the athletic minded aiming to better their sport and overall lifestyle.I have raced with the competitive Full Throttle Endurance triathlon team in NYC. In the summer of 2012, I will be starting a new triathlon team in Stamford, CT with the advent of a new Chelsea Piers fitness center.
Photo Credits
computers image by Olga Chernetskaya from Fotolia.com