Things You'll Need
Tape measure
Paper and pencil
1-by-3 board
Table saw
Power drill
Wood glue
Screws
Circular saw
Sandpaper
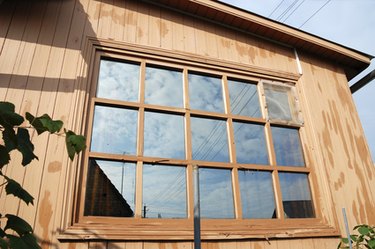
Windows that do not have any type of treatment, such as a blind or drape, can have a removable wood grill added. This can change the look of the window or room without making any permanent changes to the window. Making a wooden grill can be done by first determining what type of design to use and then obtaining the material needed to complete the project.
Step 1
Measure the width and height of the window opening with the tape measure. Subtract two inches from the measurement for the width and then make a note of the measurements on a piece of paper.
Video of the Day
Step 2
Set the guide on the table saw to a width of one inch and then cut a 1-by-3 board into one-inch strips.
Step 3
Cut two of the cut one-inch strips of wood, to the measurement for the length noted on the paper, with the circular saw. Cut another two pieces to the width.
Step 4
Place the pieces together to form the shape of the window opening. Drill a hole into each corner where the pieces of wood meet. Apply wood glue to the end of the pieces for the width and then secure the wood pieces together with screws using the power drill. This will be the frame for the grill.
Step 5
Measure the width of the frame and make a mark in the center on the top and bottom. Measure the distance between the marks and then cut a one-inch strip to the required length with the circular saw.
Step 6
Apply wood glue to the top and bottom of the one-inch piece of wood and then place it in the frame on the pencil marks.
Step 7
Measure the length of each side and make a mark every six inches. Place a straight edge on the marks and draw a line on the center piece of wood.
Step 8
Measure the width on the left and right side of the center piece of wood. Cut pieces from the one-inch strips of wood to the measurements.
Step 9
Apply wood glue to the ends of the cut pieces of wood and then place them in the frame on the pencil marks. Wait at least 12 hours for the glue to dry.
Step 10
Set the completed grill in the window to see how it will fit. Sand the grill with the sandpaper to make it smooth.
Tip
Paint the grill to match the color of the window.
Video of the Day