Painting beadboard is a DIY project that most homeowners can handle themselves — and with the right paint it can give your space quite the makeover. The process is similar to painting any other wall surface, but there are a few extra steps, like sanding and painting details with a brush.
What Is Beadboard?
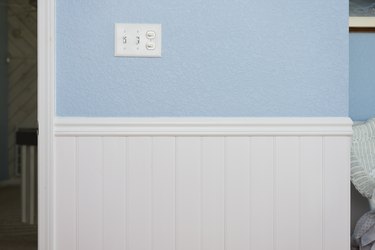
Beadboard is a type of wainscoting or wall paneling that consists of individual, narrow tongue-and-groove wood panels with a “bead” — a small indentation or ridge — milled on the edge. When installed vertically, beadboard wainscoting can take up the entire wall or can serve as wainscoting that occupies only the lower portion of the wall for a stylish accent.
Video of the Day
Beadboard Design Options
Wainscoting was originally designed to protect the wall that it partially covers. It's usually capped by molding (called a chair rail), with the bottom of the beadboard extending to the baseboard molding. Painting wainscoting a contrasting or complementary color to the upper part of the wall is a popular (and stylish) practice among homeowners to achieve a bold look.
Video of the Day
Today, beadboard is available in large panels, which are usually made of MDF (medium-density fiberboard). This material can be nailed, sawn, and painted like wood. Beadboard panels come in a variety of sizes, up to and including 4x8-foot plywood-size panels.
Beadboard provides a casual, cottagelike feel to a room. It's one of those distinctive wall coverings, like shiplap and board and batten treatments, that break away from the common flat drywall painted wall. White tends to be the default color for beadboard, but many homeowners opt for painting beadboard (especially wainscoting beadboard) another color for a little more flair.
What Paint to Use When Painting Beadboard
Because beadboard is a wall covering, many people choose eggshell or satin gloss paint, which is what most homeowners use to paint their walls. But when beadboard is used as wainscoting, it acts more like trim or molding. Think of the beadboard, chair rail, and baseboard as one assembly composed of three components. You can paint beadboard a different color from the other two, but they still work together.
Beadboard looks and performs best when it's glossy — so satin or eggshell finishes are not ideal. So, beadboard will look best with a semigloss paint. In addition to the look, a semigloss covering hides dirt and other imperfections, is easy to clean, and resists damage from bumps and nicks better than a low-shine paint. That makes it a top-notch choice if you have kids and pets running around.
Many people use a roller when painting beadboard, but the surface consists of raised "beads" and indentations. The look is consistent over the entire surface, and if you are using a roller, it's easy to apply too much paint and fill the indentations. Even if only a few areas are filled in, it will ruin the consistent look. Although it will take longer, using a paintbrush will give you more control over the final look.
Things You'll Need
Cleaning supplies: buckets, sponges, degreaser detergent
Nail set and hammer (if necessary)
Sanding sponge or sandpaper
Vacuum cleaner with soft dusting tool attachment
Lint-free cloths
How to Paint Beadboard
1. Clean the Beadboard Surface
As with any surface about to be painted, proper preparation is a must. Beadboard must be clean and dry before painting. Go over the entire surface with a surface cleaner and/or degreaser, rinse, and allow it to dry thoroughly. Clean the chair rail and baseboard as well.
2. Protect Nearby Surfaces
Apply painter's tape on baseboards and the upper portion of the wall as necessary to protect them from getting paint on them. To protect floors, run a strip of tape along the floor next to the baseboard. Then, spread out a drop cloth against the baseboard. The drop cloth may move while you are working, but the tape will add an extra layer of protection.
3. Prep the Surface
The surface of the beadboard must be completely smooth before you begin painting. This usually entails using spackle to fill holes.
Follow these steps to prep the surface of your beadboard:
- For new installations, use a nail set and hammer to set any nails that protrude above the surface of the beadboard.
- Use a putty knife to apply spackle to fill in the nail holes.
- Sand the spackle smooth when dry.
- Vacuum the surface of the beadboard to remove dust.
- Follow up by going over the surface with a damp, lint-free cloth.
4. Prime the Surface
If your beadboard comes pre-primed, you can skip most of this step, although it is a good idea to prime any repairs or spackled areas.
Here's how to prime the surface of your beadboard before painting:
- Prime the chair rail first, working across the molding in a horizontal direction.
- Apply primer to the beaded portions of the beadboard. Apply the primer lightly, starting at the top and working down. Cover a section of four or five beads from top to bottom.
- Prime the rest of the beadboard panels in that section from top to bottom.
- Move on to the next section.
- Apply primer to the baseboard.
- Let the primer dry overnight.
5. Sand the Beadboard Surface
Use extra-fine (220- or 320-grit) sandpaper or a sanding sponge to lightly sand the entire surface, especially in the lines of the beads and board joints. Primer often causes the grain in the wood to swell and rise. Sanding the primed surface helps ensure a smooth topcoat. After sanding, vacuum the surface, especially the indentations around the beads, and then wipe with a damp, lint-free cloth.
6. Caulk Gaps and Other Imperfections
Load a dripless caulk gun with a good-quality interior paintable caulk. Caulk provides a smooth transition between building components, and it is one of the reasons a professional paint job looks so good. Many people like to caulk gaps before applying the primer, and it is fine to follow that sequence, but the white primer helps the gaps stand out better than an unprimed surface.
- Fill gaps, such as where the chair rail meets the wall, where the beadboard abuts door and window trim, and where beadboard pieces meet at an inside or outside corner.
- Remove caulk that finds its way into the indentations in the beadboard using a damp cloth wrapped around the edge of the putty knife.
- Allow the caulk to dry before painting per the manufacturer's directions.
7. Paint the Beadboard
Apply the paint in the same sequence as you applied the primer. As you paint, keep a wet edge, meaning once you've laid down some paint, start the next brushful on an unpainted area, working back to the wet edge.
Here's how to paint your beadboard paneling:
- Paint the chair rail.
- Apply a light first coat of paint to the beaded areas of the wood paneling, working in a small area and painting from top to bottom.
- Fill in the rest of the panels in that section.
- Move on to the next section.
- Paint the baseboard.
- Lightly sand the surface once the paint is dry.
- Vacuum and clean the surface.
- Apply a second coat.