Sand art (the formation of creations, pictures and imagery) is an admired activity seeped in history and with many different cultural components. It involves varied techniques, materials and has embraced an array of subject matters. Sand art may be divided into three main categories: sand art paintings, bottled sand art and sculpture sand art.
History
Video of the Day
According to Sand Gallery, what is most commonly known today as sand art, originated in the city of Petra in Jordan, during the early 20th century. Sand Gallery goes further to state that, the craft was inspired by the multi-colored sand and rocks found in the Petra Mountains and that during the last half of the 1940s, artistic designs inspired by camels grew in popularity. It is claimed by Sand Gallery that these designs were evident in the bottles found from that period of time, from which its basic shapes could be noticed.
Video of the Day
Sand Art Paintings
Culturally, sand art paintings are most popularly known as being part of the Navajo tribe, the largest tribe of North American Indians. According to Navajo tradition, its origins are found in the Holy People who dwelled in the underworld. The tribe views sand painting as a key aspect of several healing and ceremonial activities.
Other popular forms of culturally inspired sand paintings include the Tibetan Buddhist sand Mandala, as well as Aboriginal ground art.
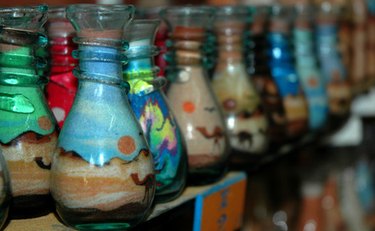
Bottled Sand Art
Nowadays, bottled sand art is a favorite pastime of young children and adults. It entails obtaining sand and mixing it with powder paint or food coloring to create different hues. This may then be poured into a variety of bottles (jars, wine and plastic bottles) in order to form designs and colorful layers, used for decorative purposes. Several sand art bottle manufacturing companies exist creating and selling goods ranging from simple decorative pieces to picture frames and flowerpots.
Sculpture Sand Art
Sand sculptures are created using sand and water and can take on virtually any form that the creator desires . Fashionable themes of sand sculpture usually involve fantasy-based images such as mermaids, aliens and mythical creatures. Other well-known forms of sand sculpture include castles, human beings and plants.
Sand sculptures are often made with the assistance of wooden frames as sand is a fragile element. The tools used in the creation process include shovels, brushes, palette knives and straws.
Significance
From sand bottles made by children and sand sculptures, to the complex culturally inspired sand paintings, sand art represents a certain form of beauty and has the ability to convey different stories. Over the years, competitions have been established and shows and fairs created, validating sand art as a true art form.