
How to Paint Cinder Block to Look Like Brick

Cinder blocks are used in construction because of their easy installation, durability and low cost. The appearance that the blocks provide, however, is very plain and utilitarian. One fairly easy way you can hide the cinder blocks' appearance is by faux painting them to look like a brick wall.
Things You Will Need
- Power washer
- Primer
- Paintbrushes
- Paint roller
- Paint
- Tape measure
- 1/2-inch plywood
- Circular saw
- Synthetic sponges
- Scissors
- Glue
- Laser level
Warning
Do not look into the laser beam from the laser level, or shine the laser level into anyone's eyes.
-
Power wash the walls and allow them to dry for about 24 hours.
-
Paint the wall with primer. Begin by cutting in along the edges of the wall by applying the primer with a paint brush. Use smooth, even strokes when applying the primer. Cover the main part of the walls using a paint roller. Cover an area that measures about 3 feet square before moving on to the next section. Allow the primer to dry. This usually takes 4 to 6 hours, but read the instructions on the can to be sure.
-
Paint the wall with the color that you are using to represent the mortar for the faux bricks. This is the color that will appear in the gaps between the faux bricks. Use the same technique you used to apply the primer. Allow the paint to dry.
-
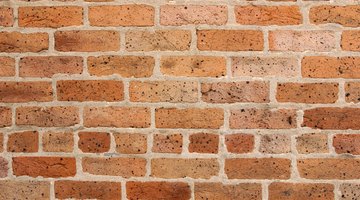
Build a stamp to apply the brick pattern to the wall. Begin by cutting synthetic sponges to the size of bricks (7 1/2 in. long by 2 1/4 in. high is standard). Cut a sheet of 1/2-in. plywood that measures 39 and 3/4 inches long and 11 inches high. Glue the sponges to the plywood. Use four rows of bricks, with five bricks in rows 2 and 4, and four bricks in rows 1 and 3. Stagger the sponges in each row, the same way that bricks are staggered, keeping a 3/8-inch gap between the sponges and around the outer edges of the board, as this is the standard spacing between bricks.
-
Apply the paint you want to use for the bricks onto the stamp with a paint roller.
-
Apply the sponge stamp. Start in the top corner and press the stamp firmly against the wall. Move to the next section, keeping a 3/8-inch gap between applications. Cover the entire wall using this technique and allow the paint to dry. Use a laser level to provide a guide when stamping the brick pattern on the wall. This is a tool that you can purchase or rent that projects a laser beam onto the length of the wall to create a straight line.
-
Fill the gaps left unpainted by the stamp by cutting a sponge to fit the spaces on the walls. Remember to take into account the 3/8-inch gap around each brick when measuring the spaces. Apply paint on the end of the sponge, and press the sponge on the wall in the spaces left bare by the stamp. Allow the paint to dry.
The Drip Cap
- Cinder blocks are used in construction because of their easy installation, durability and low cost.
- Paint the wall with primer.
- Begin by cutting in along the edges of the wall by applying the primer with a paint brush.
- Use four rows of bricks, with five bricks in rows 2 and 4, and four bricks in rows 1 and 3.
- Move to the next section, keeping a 3/8-inch gap between applications.
- This is a tool that you can purchase or rent that projects a laser beam onto the length of the wall to create a straight line.
References
Writer Bio
Carson Barrett began writing professionally in 2009. He has been published on various websites. Barrett is currently attending Bucks County Community College, pursuing a Bachelor of Arts in sports management.
Photo Credits
- Hemera Technologies/AbleStock.com/Getty Images
- Hemera Technologies/AbleStock.com/Getty Images
More Articles