Things You'll Need
Sewing Machine
Leather Needles
Leather
Pattern
1/4-inch Elastic
Soft-sole shoes are all the rage now days and there is no wonder. They are recommended by pediatric and podiatric specialist as well. While you can pay $30 or more for a pair of soft-sole shoes, leather or otherwise, you can make them for mere dollars a piece!
With the following free links to patterns and simple directions anyone with a moderate understanding of how to follow a pattern and use a sewing machine can be making soft-sole shoes for their little ones in no time at all!
Video of the Day
Step 1
Free Patterns
There are several places you can get patterns on the internet for making the same basic soft-sole shoe. The following two links are to places where you can down load a single size of shoe pattern. You may need to search the page for the link, but it's there.
I've not personally tried either of these links but the pattern pieces look similar to the one's I use and I can't imagine whey they wouldn't work. Both sites also have basic directions as well.
Step 2
Purchase a Pattern
You also have the option available to purchase a pattern and directions. If your child doesn't fit in the exact size of pattern offered for free this may be the better option for you. Pattern makers who sell their patterns normally offer a wider variety of sizes and more detailed instructions. Both of the stores below sell patterns in all sizes as well as leather.
At this store you can purchase two size sets for $5 and other size sets for only $2 more and have the files emailed to you. You can also purchase sample kits that contain all leathers needed to make a complete pair of shoe; out of recycled and prepared leather. http://makethemyourself.com/shoe.html
This store offers all sizes for $17. This store has several options on purchasing leather by the pound. http://www.chloetoesboutique.com/store/WsDefault.asp?Cat=SoftLeatherShoesPattern
Step 3
Purchasing Leather
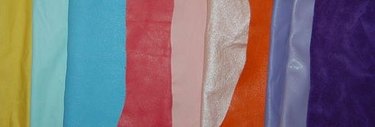
Regardless of how you acquire your pattern your first chore will be to locate leather. Until you're sure you will enjoy making soft-sole shoes and have an aptitude for it, as well as like the pattern you are working with, I would suggest putting little expense or time into purchasing your leather.
If you are lucky enough to have a local leather store, check and see if they have "scrap bins" where leather is sold by the pound. The reason you need to do this is that you can not purchase leather by the foot or yard like you do fabric. Leather is priced by the foot but sold by the "hide" only, and who really needs 25 feet of one color of leather?
One of the largest leather stores in America is Tandy's leather. Here is a link to their location web page, check and see if there is one near you.
Another suggestion is to use recycled. Check your local thrift stores for leather pants, skirts, and jackets that you can cut up and reuse. After cutting the leather into smaller flat pieces, be sure to pre-wash any leather you are going to use in hot water, with a color catcher, and dry in a dryer before use. This will preshrink the leather so you can machine wash the shoes you are making.
Step 4
Cutting Out Your Pattern
You can not pin your pattern to leather as the pin holes will remain after you remove the pins. Simple trace the pattern pieces onto the back side of the leather you will be using. Gel pens seem to work best, use a light colored one on dark leathers and a darker one on light colored leather. Be sure to flip your pieces over so you end up with a right and left facing piece of all patterns.
Step 5

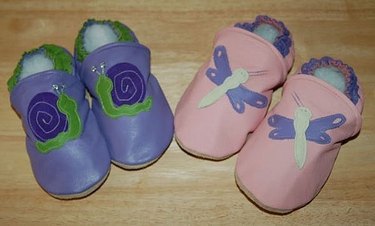
Adding an Appliqué
If you want to add any decoration or an appliqué to the shoe you need to do that prior to assembling the shoe. Choose simple appliqués without a lot of pieces. Also keep in mind that you can use standard hole punches in many different sizes to achieve different affects; eyes, center of flowers, center of tires, etc.
Using either fabric glue or double sided tape align your appliqués on each shoe top as you want them to appear. If the appliqué you choose faces a specific direction it usually looks best to have them facing each other.
Sew around visible edges of the appliqué.
Step 6

Reinforcing the Top
Most patterns will have you cut two (2) pieces of the Top side for each shoe; one for the actual top and one as a lining. Keep in mind the lining will be touching your child's foot and you will want to use suede or the back side of shiny leather.
The lining piece of each Top will also have slits cut into it for elastic. It is always a good idea to cut out a scrap piece of leather and sew around the area the slits will be cut (on the side of the lining that will NOT be against your child's foot). When you cut the slots for the elastic to run through, cut through the lining and the reinforcement.
Step 7
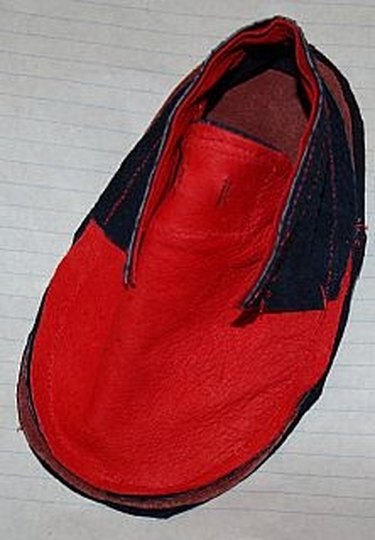
Completing the Shoe
The rest is pretty simple. You will sew a Top piece and a lining Top together across the top edge. Clip triangles out of the seam allowance to allow it to easily curve. Turn right side out and run a seam across top edge to reinforce.
Sew the casing onto the top of the heel. Be sure to reinforce the ends of each seam as their will be a lot of stress against them.
Lay the sole with the bottom side up down and center the Top piece, with the outer leather layer down, over it. You can use paper clips or binder clips to position your pieces and make sure the two edges of the top piece align on either side of the sole correctly. Sew on. Follow same directions for attaching heel.
Reinforce seam and trim. Turn right side out. Run ¼ inch elastic through casing and slit in Top lining. Try on baby's foot and pull until fit is correct. Sew elastic together and feed end into casing and away from baby's foot.
Tip
Misty Marquardt is the designer and owner of Make Them Yourself patterns. She has over 20 years experience sewing with all fabrics and is currently teaching classes on making leather shoes at the University of Texas. Visit her site to check out her pattern line (which includes a Mary Jane, Sandal, Boot, and Standard Soft-Sole Shoe Pattern) http://www.makethemyourself.com.
Video of the Day