GE built-in microwave ovens are secured in two places: with a wall panel along the back and screws drilled through the top panel. Removing these over-the-range microwaves is relatively straightforward, but the major factor to be prepared for is the weight of the microwave. Microwaves can easily weigh over 50 pounds, and it's a good idea to have a helper who can assist you in lifting the microwave off the bracket and setting it down safely.
Preparing Built-in Microwave Oven Removal
Video of the Day
According to House Improvements, it's a good idea to start by scooting the entire stove out of the way to avoid straining across your range to lift the heavy microwave. Lay down a piece of cardboard or plywood to pull the range onto to avoid scratching the floor.
Video of the Day
If you cannot move the range, you can still remove your GE built-in microwave oven with this appliance in place. Consider protecting the stove top with a drop cloth or piece of cardboard just in case debris or the microwave itself falls.
Finally, unplug the microwave before beginning to remove it. The outlet is typically hidden in the cabinet above the microwave. Remove any items stored in this cabinet to ensure the cord will not get caught on anything as the microwave is lowered.
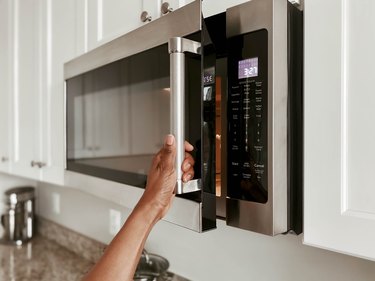
Remove a Built-in Microwave
Use a step ladder to allow you to see the location of the two or three screws drilled through the bottom of the cabinet into the top of the microwave. Remove all of these screws with a drill or screwdriver. The front of the microwave will drop down slightly, but its weight is still supported by the back wall panel.
Get off the step ladder and move it out of the way. With one or both arms under the microwave (and your helper ready to support the microwave as well), lift the microwave up slightly and toward you until it is no longer caught by the lip of the wall panel. You're now supporting the full weight of the microwave, so set it down gently on the counter. Have your helper make sure the cord does not get caught as it feeds out of the hole in the cabinet.
Installing a New Built-In Microwave
If you like having a built-in microwave and want to install a new one, you'll first need to find one with the proper dimensions to fit the existing space. Your new microwave will come with its own wall bracket. If your current wall bracket is the same, there's no need to remove it. If not, unscrew the old one and use the template and instruction manual included with the new microwave to properly secure the new wall bracket.
Next, you'll reverse the steps you followed to remove your GE built-in microwave oven. Feed the cord through the hole in the bottom of the upper cabinet and hook the lip on the microwave's back panel over the corresponding lip on the wall bracket until the microwave is secure. Then, drill screws through the upper cabinet to support the weight of the front end. Finally, plug in the microwave.
Removing Built-In Microwave Altogether
If it's just not convenient for you to use an over-the-range microwave or you'd prefer to install a range hood instead, you can remove the wall bracket and patch the holes with a bit of drywall putty. Allow the putty to dry, and then sand it smooth and paint over it. The wall will look as good as new and you can leave it blank, extend your backsplash and/or install a range hood instead of a microwave.