Easily seen in gardens, forests, and fields, butterflies and their distinct and beautiful wings have captured people's attention for hundreds of years. Though we often think of them as a single part, the large wings of butterflies are actually covered with tiny, colorful scales. The effect of all these tiny scales combined is what gives butterflies the beautiful and sometimes complex patterns on their wings. Besides moths, there is no other insect group that has these types of scales on their wings -- and few other insects have become so treasured to human eyes as a result. Despite this, however, there is no distinct meaning of butterfly colors.
TL;DR (Too Long; Didn't Read)
While iridescent butterfly wings are seen as beautiful, the various colors and patterns of butterfly wings carry no inherent meaning: butterflies evolved to get their colors, and use them to camouflage themselves from predators like birds, or to attract mates at long distances. Butterfly symbolism is a human creation, and since ancient times butterfly wings have been seen as a symbol of spirituality.
Butterfly Wing Evolution
Butterflies got their colors as part of an evolutionary process. Both moths and butterflies belong to the scaled wing order of insects known as Lepidoptera. Moths came before butterflies, and their fossilized remains date to 150 million years ago. Millions of years ago some moths, which are usually nocturnal, became active during the day and had scales with brighter colors. These traits gave certain advantages, leading to the bright colors of butterflies.
Camouflage from Predators
When a brightly colored butterfly does not want to stand out, like on an overcast day, it closes its wings and hide its colors. With wings closed, butterflies become difficult to see. Other butterflies have colors that allow them to blend in with their surroundings. This is known as cryptic coloration, and it fools predators. The butterflies’ colors blend in so well with the environment that the insect is almost indistinguishable.
Warning and Signaling
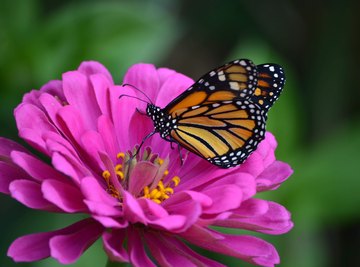
Many groups of butterflies have bright colors that warn predators that they are poisonous and don’t taste good. The monarch butterfly, with its black and orange markings, is a good example. Birds have learned to avoid them, associating the colors with danger. The caterpillar of the monarch butterfly eats the leaves of the milkweed tree, making the butterfly both toxic and bitter for birds. For some butterflies, the colors and markings on their wings mean something else entirely. They are a way to identify and attract potential mates.
Poison and Mimicry
Some butterflies have colors on their wings that warn predators that they are poisonous and not very tasty. But these sneaky butterflies are not poisonous, and they could make a fine meal for a hungry bird. Certain species of butterfly have adapted and evolved wing colors that mimic or copy the markings on other, poisonous species of butterflies. This mimicry is close enough that over time, predators learned to avoid both butterflies. An example of this is the viceroy butterfly, which mimics the monarch butterfly’s orange and black markings.
Humans and Butterfly Symbolism
Long before we fully understood butterflies and the way they use their wings to adapt to their environment, humans saw the strange, beautiful insects as spiritual symbols. Butterfly symbolism, dating back to Ancient Egypt, revolves around the idea that butterflies are either from or symbolic of the afterlife: in Ancient Greece, Aristotle called butterflies "psyche," the word for soul -- and the Aztecs believed that butterflies were the spirits of deceased ancestors, come to visit and check up on their descendants. As a result, men of high social standing would carry bouquets of sweet-smelling flowers to attract and appeal to butterflies in the area. Other cultures in South America gave butterflies and moths a high position in their mythologies, and even today dreams featuring butterflies are said to be good omens. In Ireland specifically, they are seen as a symbol of good luck -- regardless of wing color.