Shop
Gift Guides
Tech Toys
Tech on a budget
All Shop
Smart Life
Gadgets
Cool Apps
Travel
Smartphones
All Smart Life
Technically for parents
Education
Online Safety
All Technically for parents
Tech Support
How to
Reviews
All Tech Support
Entertainment
What’s streaming
Social Life
All Entertainment
CONNECT WITH US
JOIN OUR NEWSLETTER
Get the latest news and alerts!
Later
Notify
Home
Technically for Parents
Technically for Parents
By
Jill Layton
5 Ways to Celebrate National STEAM Day 2023
Technically for Parents
By
Jill Layton
YouTube Is Limiting Teens' Repeated Viewing of Certain Topics
Technically for Parents
By
Jill Layton
Is Roblox Safe for Kids?
Technically for Parents
By
Jill Layton
Yik Yak Is Back, but How Will It Prevent Bullying?
Technically for Parents
By
Jill Layton
5 Parenting Podcasts to Get You Through the Day
Technically for Parents
By
Jill Layton
KidGooRoo's New Program Makes After-School Activities Affordable for All Kids
Technically for Parents
By
Jill Layton
This Website Finds Fun, Local Activities to Do With Your Kids
Technically for Parents
By
Jill Layton
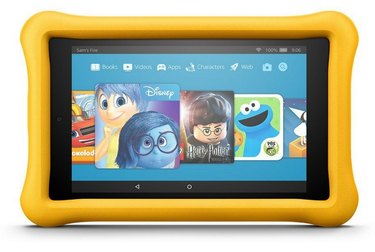
Amazon Will Replace Your Kids' Tablet for Free If It Breaks
Technically for Parents
By
Jason Cipriani
17 Things Parents Should Know About Roblox, Your Kid's New Obsession
Technically for Parents
By
Jacqueline Emigh
Yes, You Can Report Inappropriate Content Online
Technically for Parents
By
Jacqueline Emigh
6 Fun Educational Toys and Games for Special Needs Kids
Technically for Parents
By
Jacqueline Emigh
Four Apps That Might Be Dangerous for Kids
Technically for Parents
By
Adrian Grahams
How to Limit the Wireless Signal Coverage at Home
Technically for Parents
By
Steven Melendez
How do I Bypass FortiGuard Web Filtering?
Technically for Parents
By
Julius Vandersteen
What Does SMH Stand for in a Text Message?
Technically for Parents
By
Steven Melendez
What Does "Cc" Mean?
Technically for Parents
By
Zach Lazzari
How to Lock a TV to Prevent Kids From Using It
Technically for Parents
By
Erica Kasper
Fact Checked
What Does "Open Box" Mean on Amazon?
Technically for Parents
By
Ryan Cockerham
What Does PNP Mean on Craigslist?
Technically for Parents
By
Laura Nations
What Does a Restricted Number Mean?
Technically for Parents
By
Stephanie Faris
What Does EUC Mean on eBay?
Technically for Parents
By
Harvey Spector
What Does ASL Mean on Omegle?
Technically for Parents
By
Stephanie Faris
Can I Use Someone Else's Video on My YouTube Channel?
Technically for Parents
By
Neal Litherland
How to Block Nudity Websites
Technically for Parents
By
Fred Decker
How to Block Kids From Downloading Apps Onto an Android
Technically for Parents
By
Dan Ketchum
Definitions of Computer Terms for Kids
Technically for Parents
By
Micah McDunnigan
Can You Be Hacked on Chatroulette?
Technically for Parents
By
Laurie Brenner
What Does Invalid MMI Code Mean?
Technically for Parents
By
Jane Williams
What Does it Mean if Your Laptop Charger Buzzes?
Technically for Parents
By
Milton Kazmeyer
What Does Bad Checksum Mean?
Technically for Parents
By
David Weinberg
What Does the F6 Button Do?
Technically for Parents
By
Dan Stone
What Does a "Server Hangup" Mean?
Technically for Parents
By
Meg North
What Does Gateway Ping Mean?
Technically for Parents
By
AnthonyO
What Does Error 32 Mean on Time Warner Digital Cable?
Technically for Parents
By
Shea Laverty
What Does Monitor Pivot Mean?
Technically for Parents
By
Karen Carter
Fact Checked
What Does Recovering Orphaned File Mean?
Technically for Parents
1
2
3
4
>
Report an Issue
Contact*:
Severity*:
High
Normal
Low
Description*:
Screenshot loading...
Cancel
Submit