Ablestock.com/AbleStock.com/Getty Images
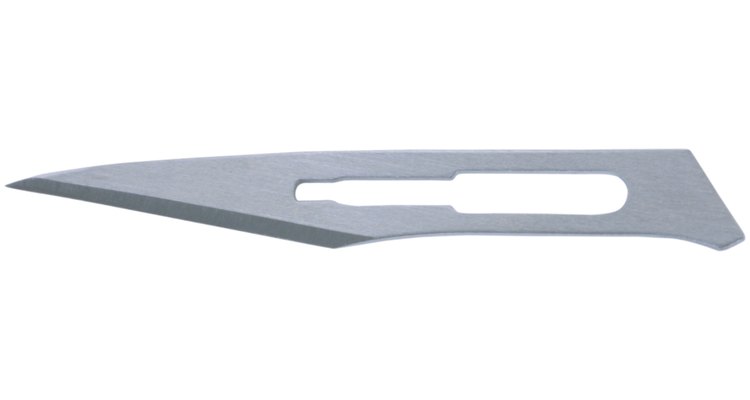
Sharpening a Cold Steel knife is just like sharpening any other knife except that many Cold Steel knives have a thicker than usual blade and, in some cases, are made from carbon steel which is harder than the stainless steel used in other brands of knives.
Sharpen using abrasive stones to create a burr
Choose your abrasive. Whatever sharpening system you are using, choose the most coarse stone to begin with. The coarser the abrasive you begin with, the faster the process will go. Because Cold Steel knives are often very thick and of a hard carbon steel, it is important to use the most coarse and newest stone available to you.
Choose your angle. Before you begin sharpening your knife, choose an angle in which to sharpen it. A good rule of thumb is 20 degrees, but that isn’t a hard-and-fast rule. Twenty degrees will give you an average level of cutting ability with an average level of edge-holding ability.
The higher the angle, the stronger the edge will be, the more abuse it will take and the longer it will last. The lower the edge angle, the better it will cut (think razor blade) but it will become damaged easily.
Cold Steel has some very good steels with a very good heat treat, so an edge of 10-15 degrees will have the best cutting ability.
Get the motion right. Place the edge of the knife on the stone if it’s a flat hone on a table, or if it’s a rod, you’ll be holding the knife still and moving the stone along the knife.
Start as the base of the blade and move in the direction of the edge (moving the knife or the hone depending on your system) like you’re trying to slice a piece off of your sharpening hone.
Maintain the chosen angle while making the slicing motion. Many knife sharpening kits contain guides that assist in maintaining your chosen angle, but if yours doesn’t you will have to focus, and practice, at keeping the correct angle.
As you make the slicing motion, draw the knife handle off the stone, while maintaining the angle so that you’re sharpening the base of the blade at the start of the motion and finishing the motion with the tip being sharpened. Later you will focus on one side of the knife at a time but in order to avoid having a lopsided edge, sharpen both sides until the knife is almost sharp.
Make ten repetitions and reverse sides to sharpen the other side the same way.
Repeat this until the knife feels sharp by testing it with your fingers but won’t quite cut paper without tearing it.
Create a burr. Once the knife feels sharp but will not cut paper, begin working on one side only. Sharpen one side 20 times and then check it for a burr.
Once the proper amount of metal has been removed from one side, the steel at the very edge will begin to fold over creating a tiny lip on the opposite side. This is called a burr. You can check for a burr by wiping your finger down the opposite side of the blade from the direction of spine off of the edge. Feel that the side opposite the one you’re sharpening contains a burr that will scrape your finger while the side you are sharpening will remain smooth.
Your goal is the burr.
Continue sharpening one side, checking it after every 20 strokes, only until you feel the burr all along the opposite side.
Switch sides. Once you’ve sharpened one side until there is a burr all along the opposite side, switch sides and sharpen the opposite side of the blade only. Employ the same method stated above, just on the other side of the blade. Check for a burr every 20 strokes until you have achieved a burr all along the other side.
Switch to medium abrasive. Once you’ve achieved the burr on both sides, switch from the coarse sharpening to a medium-grit sharpening stone and repeat the sharpening process, sharpening first one side to a burr, and then the other.
Switch to fine abrasive. Switch to a fine sharpening stone and repeat the above step. At this stage, the burr will still form but will be much smaller and more difficult to detect. Use your fingernail to feel for the burr.
Remove the burr. Once you’ve sharpened to the burr with coarse, medium, and fine stones, you will be left with a sharp knife, but one that has a burr along one side. If left in this state, that burr will eventually roll over further or break off, leaving the knife with a dull or damaged edge.
Remove the burr by alternating sharpening strokes from one side of the knife to the other just as you did at the very beginning of this process.
Check for the absence of the burr just as you checked for a burr throughout the process. The edge should feel sharp and smooth on both sides.
Related Articles

How to Use a Bird's Beak Knife

What Metals Are Razors Made Out Of?
How to Sharpen a Meat Slicer Blade

How to Tell If a Gem Is a Kunzite?
What Type of Knife to Carve Prime Rib?

How to Write a Letter to Someone Who ...
How do I Adjust Lorus Watch Straps?

How to Clean Lapis Lazuli

How to Sterilize a Double Edged Safety ...
How to Use a Merkur Futur Razor
How to Butterfly a Steak to Cook Faster
Tungsten Rings Vs. Stainless Steel Rings

How to Cook Sliced Roast Beef for ...
How to Use Electric Nose Hair Trimmers

Types of Hair Scissors

How to Use a Watch Case Opener
How to Clean the Ceramic Plates on a ...
How to Sharpen Hairdressing Scissors

How Do I Blunt Cut My Hair?
Conair Clipper Instructions
References
Writer Bio
Jim Cunningham has been a political writer since 2008. He has covered politics professionally and his blog was named one of the "Best New Political Blogs" by the Democratic Underground. Cunningham has a Bachelor of Science in art and communications from the University of Southern Colorado.
Photo Credits
Ablestock.com/AbleStock.com/Getty Images