
How to Build an Indoor Privacy Screen

Indoor privacy screens, also known as Japanese shoji screens, have existed since the early eighth century AD. Though originally made in China, it was in Japan that these screens developed into what they are today.
Most screens are translucent and are constructed of multiple folding panels made of bamboo or cedar and rice paper or fabric. The screens are traditionally used to create space within a room or home. These screens can be used to create positive chi, or energy, in a room and to develop feng shui, the art of energy balance. This is how to build an indoor privacy screen with easily accessible materials.
Things You Will Need
- 42½ feet of 1-by-2-inch boards
- 4 two-way hinges
- 6 yards of translucent fabric
- Scissors
- Hand drill
- Hand saw
- 12 screws
- Approximately 50 decorative thumb tacks.
-
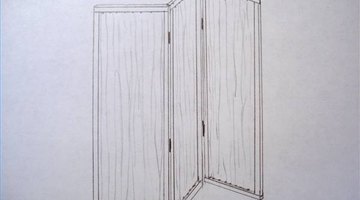
Sketch out the three-paneled privacy screen to visualize what you are making and to keep in mind what goes where.
-
Cut the boards into six long and six short pieces. The long boards should be 68 inches long, and the short boards should be 17 inches long.
-
Use the hand drill and screw the boards together to make three rectangular frames. Screw the 17-inch pieces at the ends of the 68-inch pieces, using one screw at each end. The resulting frames should be 17 by 70 inches.
-
Roll out your chosen fabric. Translucent fabric in a neutral color works best. This way, the fabric will let through some light but will not be see-through. Cut the fabric into three sections of 2 yards each.
-
Align one section of fabric in one of the rectangular frames. It will be much wider than the frame, and this is where the thumbtacks come in. Use approximately seven thumbtacks to attach the fabric to each end of the wood frame. The fabric will acquire pleats and folds this way. Place one thumbtack about every 2 inches.
-
Place the rest of the fabric pieces inside the wood frames in the same way.
-
Connect the three frames with the hinges and their hardware. Most come with screws to fit them. Use 1-inch-wide hinges, since that is the width of the boards you are using.
-
Stand the structure up. It can now be used as a tri-fold privacy screen in any room of your home.


The Drip Cap
- Indoor privacy screens, also known as Japanese shoji screens, have existed since the early eighth century AD.
- Cut the boards into six long and six short pieces.
- This way, the fabric will let through some light but will not be see-through.
- Use approximately seven thumbtacks to attach the fabric to each end of the wood frame.
- Place one thumbtack about every 2 inches.
- It can now be used as a tri-fold privacy screen in any room of your home.
Resources
Photo Credits
- All illustrations and photos by Naomi Judd
- All illustrations and photos by Naomi Judd
More Articles