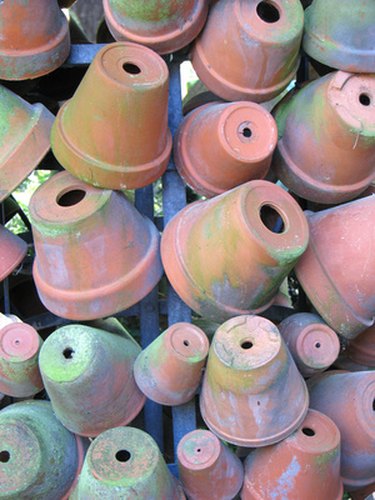
Aged terra-cotta pots add character to a garden setting, with white spots and moss sheen adding splashes of color. "Terra-cotta pots take on character as they age," claims the Martha Stewart website. The porous material of terra-cotta allows the pots to age and show this character in the right conditions. It is possible to encourage these conditions and turn a new pot into an aged pot. Aged terra-cotta pots add special interest to a garden's design while allowing you to rearrange the garden without damaging the plants. According to the Better Homes and Gardens website, "Gardening in containers provides a frugal option." With aged pots, the frugal option takes on completely new possibilities.
Video of the Day
Things You'll Need
Fertilizer
Sea Sponge
Newspaper
Paintbrush
Green Milk Paint Powder
Rag
Vinegar
Paper Plate
Buttermilk
1-Inch Foam Brush
Peat Moss
Spray Bottle
Magnetic Paint
Spoon
Plain Yogurt
White Milk Paint Powder
Cork
Bowl
Fertilizer: White Mineral Spots
Step 1
Seal the drainage hole in the terra-cotta pot by pushing a cork into the hole. The cork should fit snug to keep liquid from draining out.
Video of the Day
Step 2
Add water to the terra-cotta pot until it is 1/2-inch from the top of the pot.
Step 3
Add 5 tbsp. of fertilizer to the water. Stir until dissolved. The stronger the solution, the quicker the aging process occurs. According to the Martha Stewart website, "Pots aged this way are safe for plants, because the salts won't wash from the pot to the soil," so do not worry about damaging the pots.
Step 4
Leave the pot in a shady location for several weeks. Add water as needed to keep the pot full.
Step 5
Empty the water from the terra-cotta pot and rinse the pot. The pot will have white salt spots (age signs) and is ready for planting.
Milk Paint: Weathered Aged Patina
Step 1
Mix equal parts white milk paint powder and water in a bowl. Stir rapidly for one minute. To ensure powder is dissolved, let it sit for 20 minutes, stirring occasionally.
Step 2
Wet a sea sponge and squeeze out excess water. The sponge should be damp.
Step 3
Press the sponge into the milk paint to absorb the paint.
Step 4
Dab the paint onto the terra-cotta pot in a random pattern to create a mottled effect, as described on the Home and Garden TV website.
Step 5
Repeat the process with green milk paint powder instead of the white.
Step 6
Allow the paint to dry prior to adding soil or plants.
Yogurt: Green Patina
Step 1
Determine the amount of green patina you would like to achieve. "For a subtler look," suggests the Martha Stewart website, "first soak pots in water for 15 minutes." For a more obvious effect, begin with a dry pot.
Step 2
Mix a single-serving-size plain yogurt with a spoon.
Step 3
Apply a generous amount of yogurt to the outside surface of the terra-cotta pot using a 1-inch foam brush. For a more natural look, do not try to keep the yogurt even.
Step 4
Place the pot in a shaded, well-ventilated area for one month.
Metal: Rust
Step 1
Turn the dry terra-cotta pot upside down on a piece of newspaper. You should do this in a well-ventilated area.
Step 2
Paint the outside of the terra-cotta pot with magnetic paint. This paint contains real metal shavings. Allow the paint to dry completely.
Step 3
Wipe the outside of the terra-cotta pot with a rag soaked in vinegar once a day for a week. The vinegar will react with the metal shavings and cause the pot to rust.
Buttermilk and Moss: Moss
Step 1
Place 1 cup of peat moss onto a paper plate. Put the plate in a sunny location. Allow the moss to dry until it is brittle.
Step 2
Break the moss into small pieces, the smaller the better. Place these pieces into a large bowl.
Step 3
Pour buttermilk into the bowl until the moss is completely covered. Let the mixture sit for two hours until the moss looks soggy. According to the Martha Stewart website, "The moss serves to hold the runny buttermilk in place and vary the texture as well as to promote growth."
Step 4
Paint the outside of a dry terra-cotta pot with the mixture using a foam brush. Start at the top of the pot and work downward.
Step 5
Place the pot in a damp, dark place for three days. Check the pot frequently. The surface of the pot must stay moist; if it begins to dry out, mist it with water from a spray bottle.
Step 6
Remove and use the pot when the moss has covered the terra-cotta pot.
Tip
Vary the amount and texture of the aging material for a natural appearance.
Allow the pots to sit longer for a more obvious aged effect. Terra-cotta pots will continue to age while being used.
Warning
The yogurt and buttermilk methods attract ants and will smell bad for the first few days. Place the pot in a location where this will not create a problem.