You can connect PVC or CPVC to copper in several ways. One common method is to solder a female threaded fitting onto the copper pipe, screw in a male threaded plastic fitting and finish up by gluing plastic pipe to the plastic fitting. This isn't the best way, though, because you can't tighten the fitting if it leaks. The best and most safe option is to use a copper-to-plastic adapter. Those with moderate do-it-yourself skills can complete this project.
Step 1
Prepare the ends of the pipes you plan to join by wiping off dirt with a rag and filing the edges on the copper pipe with a metal file to remove burrs. These burrs are the products of cutting with a hacksaw, and if you don't remove them the pipe won't slip into the fitting.
Video of the Day
Step 2
Spread all-purpose plastic pipe primer onto the end of the plastic pipe and inside of a plastic-to-copper adapter, using the brush from the can. Make certain the primer works on both PVC and CPVC -- most do.
Step 3
Spread all-purpose plastic pipe cement on both the end of the plastic pipe and the inside of the plastic side of the fitting with the brush attached to the can's lid. Immediately push the fitting onto the plastic pipe. Give it a little twist, then hold it for 30 seconds until the cement sets.
Step 4
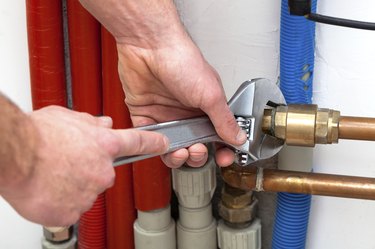
Unscrew the compression nut from the copper side of the fitting and remove the compression ring. Slide the nut and ring onto the end of copper pipe, push the end of the pipe fully into fitting, and screw the nut to the fitting.
Step 5
Tighten the nut with a pair of tongue-and-groove pliers, but don't over tighten it. The nut squeezes the ring against both the pipe and fitting, forming a watertight seal. You don't need to use pipe thread tape or pipe dope.
Video of the Day