
How to Install a Door in an Existing Metal Stud-Framed Wall

Framing with metal has many advantages over the usual wood stud. Metal-framed structures have straighter walls, since metal is less pliable than wood. Metal studs also give the dry wall a straighter, more solid surface, and this allows for a much smoother wall finish. In areas where termites are present practically everywhere, metal studs, when coupled with any other flooring than wood, all but eliminate the termite threat. Working with metal-studded walls, creating openings or closing them off, is not any more difficult than working with wood-studded walls.
-
Decide where on your wall you want to install your door. Place your door in its most naturally convenient and functional location in relation to the use of the room. Allow plenty of room for fully opening the door without being limited by another wall or other obstruction.
-
Measure the door, including its frame, to be installed. Write down your measurement. Measure your wall location from Step 1 so that you account for the total size of the entire opening. Mark the wall lightly with a pencil to match your door and frame measurement. Be prepared to move your location when you find your studs.
-
Use an electronic stud finder to locate the studs in the wall within your penciled-in location. Mark each stud you find. Move your door location the left or right as needed to center it between 2 or 3 studs. Use a laser level to mark the final location height and width of your door.
-
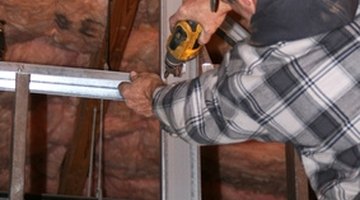
Knock out the sheetrock or dry wall between the metal studs using a hammer. Expose the studs which need to be removed to make room for your door. Remove the exposed studs and install the jam studs. Use your level and mark the height of the rough opening on both your jam studs.
-
Install your header braces on each jam stud with 4 number 8 metal stud/framing screws on each brace/clip. Set your header into the header braces or clips and attach it using 4 more number 8 framing screws. Use screws (4 per cripple stud) to install your cripple studs 12 inches on center.
-
Rip a 2 by 4 (to size if you need to) to fit into the track of the new metal frame to create a wood to wood fit for installing your pre-hung door into your opening. Set your pre-hung door and frame into your newly created opening. Tilt it toward yourself, and let the top ease into its opening. Attach the frame to opening, and make adjustments as you repeatedly open and close it.

References
Resources
Tips
- Check your floor for level and your walls for plumb.
- Be precise with your measurements.
Warnings
- Use caution with the operation of power tools
- Unless you have two or more years construction experience, or have done this before, leave this job to a professional.
Writer Bio
Chuck Brown is a freelance writer and former teacher and athletic coach. He has held professional stints as a business owner, personal fitness trainer, curriculum designer, website designer, market trader and real estate investor. Brown holds a bachelor's degree in English and a master's degree in Christian counseling.
Photo Credits
- metal studs image by Greg Pickens from Fotolia.com
- steel,construction image by Greg Pickens from Fotolia.com
- construction detail,steel studs image by Greg Pickens from Fotolia.com
More Articles