Backyard pools are lots of fun, but cold weather can keep you from enjoying them year round. Pool heaters are great, but can get expensive to purchase and use. Why not build your own and use it for free by harnessing the free energy in the sun? Here's how.
Step 1
A solar assisted pool heater is very easy to construct and use. There are only a few important parts. Start with the actual collector. Black PVC pipe works, but copper pipe painted black works even better. Either coil the copper pipe or lay the PVC pipe back and forth on the plywood. Mount them to the board using either adhesive or pipe mounts.
Video of the Day
Step 2
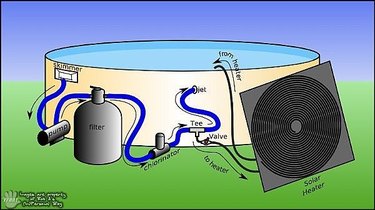
Connect one end of the solar collector to pump for your pool. Include a shut off valve so that you can turn the heater on and off by controlling whether or not water can flow through it.
Step 3
Connect the other end of the solar assisted pool heater to your pool with a length of tubing. It can either go right over the edge of your pool, or for a nicer look, you can plumb it back into your jets.
Step 4
Make sure that the solar assisted pool heater is connected into the pump after the filter, and not before. This keeps hot water from disturbing the filter, and reduces any chance of bacteria collecting in the filter.
Video of the Day