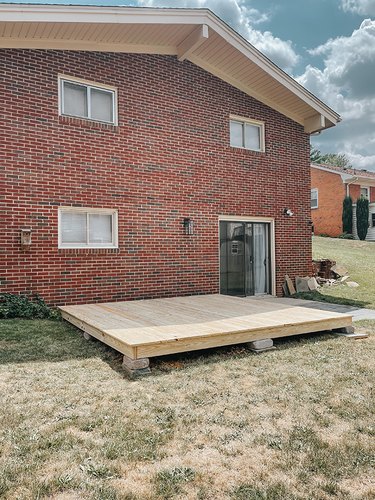
A ground-level deck provides an excellent space to relax outdoors without worrying about uneven terrain. Decks like this can be used for dining, grilling and other leisure activities. Building a deck still requires a significant amount of planning, however, and may require permission from local town governments or zoning boards, depending on your jurisdiction.
Plan Your Deck
Video of the Day
A ground-level deck is typically situated outside a first-floor door. As such, you should plan for its height to be just high enough that your door will have clearance to open freely. The deck can be built up to one step beneath the door level or flush with the door threshold.
Video of the Day
Here are some tips that will assist you in planning for your deck:
- To determine what supplies you'll need to purchase and in what quantities, determine the length and width of your deck. Multiply those together to determine the area in square feet. When you buy lumber or other decking material, you can use these dimensions to inform your purchase.
- When planning and purchasing the deck materials, you can purchase pressure-treated lumber for the supporting members and deck, or choose cedar, redwood or composite decking material to ensure your deck will survive longer in the elements.
Lay the Foundation
Though your deck is at ground level, it's ideal to use footings so it remains even over time. If you were to set a deck directly on the ground, it would sink into the earth and be subject to rot due to constant contact with moisture. It would also be at risk of infestation by termites.
Here's how to lay the foundation:
- Using a post hole digger, prepare the holes for footings. Make them at least 8 inches in diameter and at least 12 inches deep.
- Use tube forms to level the footings about 1 inch above the ground.
- Mix concrete according to the manufacturer's instructions and pour it into the footings.
- Before the concrete hardens, place a post anchor in the center of each footing.
- Use a straight edge, such as a piece of lumber, and a spirit level to be sure that the anchors are perfectly aligned.
Build the Deck
Once you've constructed your footings, you'll need to attach beams to your post anchors.
- Use the appropriate size lumber for supporting members, such as 4-by-4-inch or 2-by-6-inch, to provide superior support. Be sure that the beams are completely aligned.
- Next, attach rim joists to the support beams. These will enclose the perimeter of your deck.
- Use a drill and construction-grade screws to attach the beams.
- Next, attach the inner joists to the beam faces using joist hangers.
- Finally, lay your surface boards atop the deck structure.
- Drill through these boards and use screws to attach them to the joists below. Use a circular saw to trim any edges of the deck that don't align properly.
- Paint or stain the deck as you prefer.
Finish the Deck
You may choose to add railings to your deck. Depending on your jurisdiction, railings may be required if the deck is a certain height off the ground. It's always a good idea to use railings for the sake of safety. You may also need steps leading down into the garden, depending on the final height of the deck.
You may also choose to attach the deck to your house for added stability. To do so, use a ledger and secure it to the outer deck joist. Installation of flashing where the house and deck meet will go a long way toward the longevity of the connection and can help prevent rot where water runoff from your house collects.