Elementary school science projects such as building a solar system provide children the opportunity to create basic projects and learn a great deal. Building a solar system teaches math through the various sizes of balls required for the planets. It teaches spelling through the labeling of the planets. It teaches sequencing because the planets have to be lined up correctly based on their distance from the sun. It also teaches science concepts related to each planet's characteristics. Building a solar system takes little time and is a fun parent-child project.
- Paint brush
- Toothpicks
- Ruler
- Craft snips
- Tacky glue
- 4 1/2-inch Styrofoam rings, 2 each
- 1 each Styrofoam ball sizes 1 inch, 2 inch, 2 1/2 inch, 3 inch, 4 inch, 6 inch
- 2 each Styrofoam balls sizes 1 1/4 inch, 1 1/2 inch
- 12-by-36-inch Styrofoam rectangle
- Paint colors bright yellow, black, orange, Blue Danube, ultra blue, Christmas green, bright red, village green, nectar coral, terra-cotta, Seminole green and purple
- 2 wood dowel rods 36-by-1/8-inch
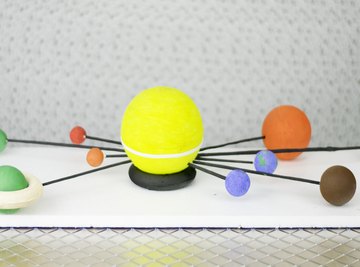
Paint the Styrofoam balls. The 6-inch ball is the sun and should be bright yellow. One Styrofoam ring should be black and the other should be nectar coral. The 1-inch ball is Mercury and should be orange. Paint one of the 1 1/2-inch balls Blue Danube for Venus and the other ultra blue for Earth. Paint one of the 1 1/4-inch balls bright red for Mars and the other purple for Venus. Paint the 2-inch ball Seminole green for Neptune. Paint the 2 1/2-inch ball terra-cotta for Uranus. Paint the 3-inch ball village green for Saturn. And the 4-inch ball orange for Jupiter.
Cut the dowel rods, then paint them black. You should cut one of each length: 2 1/2, 4, 5, 6, 7, 8, 10, 11 1/2 and 14 inches.
Glue the cut, painted dowel rods to the appropriate planet: 2 1/2-inch rod to Mercury, 4-inch rod to Venus, 5-inch rod to Earth, 6-inch rod to Mars, 7-inch rod to Jupiter, 8-inch rod to Saturn, 10-inch rod to Uranus, 11 1/2-inch rod to Neptune and 14-inch rod to Pluto.
Glue the black ring to the sun. Glue the coral ring around Saturn to form the planet's rings. Add a rubber band to the Sun about 2 1/2 inches above the base. Starting with Mercury, begin gluing the dowels for each plane to the sun at 1 inch below the rubber band. Allow the project to dry.
Things You'll Need
References
About the Author
Jennifer Holik, a professional genealogist, has been writing professionally since 2009. She writes for Chicago-area genealogy society publications. Holik has a Bachelor of Arts in history from the Missouri University of Science and Technology.
Photo Credits
Robinson Cartagena Lopez/Demand Media