Mexican tile is a treat to decorate with and needs little upkeep. It looks like buttered leather when laid properly, and gets oodles of oohs and ahhs from guests who take in its beauty. When it does need maintenance, be careful not to ruin the original aesthetic in your efforts to get the gorgeous tiles dirt-free. The proper tools, detergents and skills will get the tile clean with little damage done to the integrity of this durable floor and wall décor.
Video of the Day
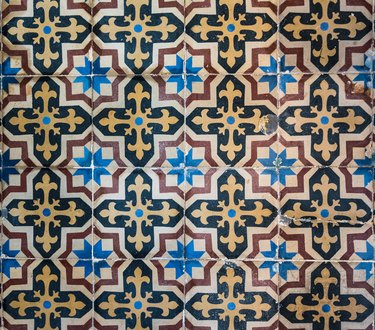
Types of Mexican Tile
There are actually a few types of Mexican tiles. The Saltillo tile tends to be the one most people mean when they are referring to Mexican tile. This form of terracotta tile or quarry tile is clay-based and made in Mexico. It comes in all shapes, colors and sizes. The same shape in varying hues is a typical design using Saltillo tiles.
Video of the Day
Manganese and Antique, which are the more textured Saltillo tiles, are less common and make a powerful aesthetic impact. Encaustic or cement tile is durable and colorful. It can stand up to high traffic and be laid out in a bevy of designs. The Talavera painted tiles are abundant in color and design choices, and give an authentic feel to any project.
How to Clean Mexican Tile Naturally
If there isn't much damage, grime or debris, you can get the sparkle back in your Saltillo tile in an afternoon. Sweep the Saltillo tile to remove any fine dust and get it as dirt-free as possible. Fill a 5-gallon bucket with a gallon of warm water and a 1/2 cup of distilled white vinegar. A hand mop is ideal for this job because it will gently float over the tiles and let the solution work its way into the crevices. A sponge mop may also be used without worry, particularly if you have stubborn smudges of grease or oil from cooking that need a bit more work. Start from one corner and end at an exit before allowing the tiles to dry. With a clean mop, rinse the tiles with warm water and air dry.
How to Clean with Detergents
If you have discoloration from build-up of previous cleaners or soap scum, you may want to reach for solutions with astringents specifically for these types of natural tiles. To remove serious stains, you may need a standard floor machine and a stripper, such as Unitex Melt Down Stripper, which is found at most home improvement stores. To remove rust stains, combine oxalic acid with a daily tile cleaner and rub it into the stains. Let the mixture sit for at least 10 minutes before wiping it away and giving the entire floor a good scrub with soapy water.