Things You'll Need
Thick bendable wire
Round wood disc
Plaster of Paris
Plastic bucket
Strips of cloth
Plaster carving tools
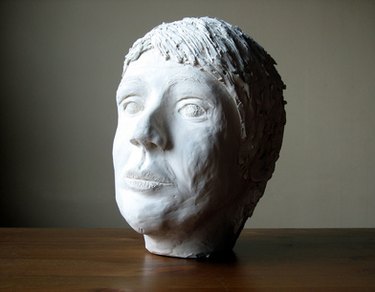
Plaster of Paris is a versatile medium that can be used in many different types of modeling and art. However, one of its most useful functions is for making statues. Have towels and clean-up materials on hand at all times because the plaster can be rather messy, especially if you like to get hands-on with your arts and crafts.
Step 1
Decide on the shape and form you want to make as a statue. It's best to draw out the general idea of the finished piece to have something to reference when working.
Video of the Day
Step 2
Build an armature in the general shape of the statue. If it's the body of a person, try to capture the form more than the detail of the body. The armature will be holding the shape of the plaster so you can carve the details and body later, acting as a simplified skeleton. Attach the wire to the wood disc so you have a base to work with.
Step 3
Fill a shop bucket with cool clean water, about half way. Slowly pour the plaster into the water. You may want to sift the plaster through your fingers to break up clumps. Keep pouring until a mound forms at the top of the water, like an underwater hill of plaster. Mix the plaster with the water until completely mixed. It will be a thin soup. Let the plaster thicken up for use later.
Step 4
Make a new small batch of plaster of Paris. Use about two inches of water and mix as you did in Step 3. Rip strips off of an old piece of cloth. Try to vary the size and length. Dip the cloth strips into the new batch of plaster before it thickens. Cover the armature with the plaster-covered cloth, wrapping it like a mummy. Let the cloth dry for about an hour.
Step 5
Scoop the thick plaster from the larger batch you did in Step 3 and apply to the armature. Build up the statue's mass by applying it in thick layers, but trying to keep and form shape. If working on the face, build it up forming generic features like a nondescript nose, eyes and mouth. You will want to put more plaster on as you will be removing most later. Don't fuss over details.
Step 6
Carve the statue using plaster carving tools that can be found at art supply shops or online. Remove plaster from the statue form, making details and defined shapes. Carve out distinct poses and postures that were not there before. If a mistake is made, apply more plaster to the area and carve again. It's always best to work with wet plaster as it's easier to add to the statue before it dries. Keep removing plaster until the statue is finished.
Step 7
Allow the plaster to cure and dry for a day or two. Mist the plaster a little to allow the drying to be slow. If small features dry out too soon, they can end up falling off and your "David" could be missing a nose or a hand the next day.
Video of the Day