As you peruse the Web, your browser creates and stores bits of information on your computer. These temporary Internet files contain such things as website browsing history, cookies and Web page caches. While these files have their uses, they tend to build up over time. Remove these temporary files in either of two locations in the Safari application.
Deleting History, Cookies and Website Data in Safari
Video of the Day
If get rid of sites that auto-populate as you type in the address bar or to delete the record of websites you have visited, delete the Safari browser history. Delete website data if you notice that certain Web pages frequently crash or are non-responsive in Safari. Cookies are small bits of information that follow you as you browse the Web. Cookies remember login information and generate relevant ads based on things you click on and look at on the Web.
Video of the Day
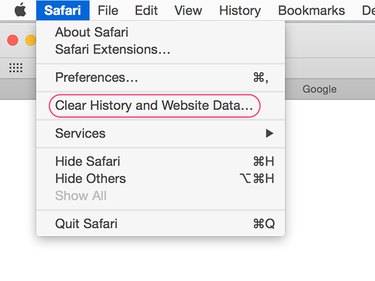
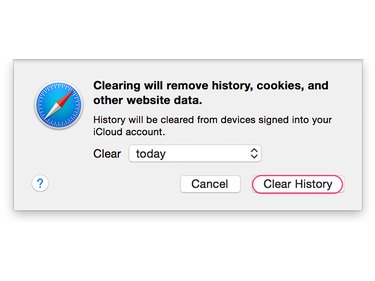
To delete browsing history, website data and cookies all at once, select Safari in the upper-left corner of the Mac menu bar while you are in the Safari application and then select Clear History and Website Data. You can also access this same prompt by selecting History in the desktop menu bar while in Safari, scrolling down and selecting Clear History and Website Data. You are then presented with the option to delete the temporary Internet files from the past hour, current day, current and previous day, or all the temporary Internet files stored in Safari. Select Clear History to finalize your decision.
Potential Consequences of Deleting Temporary Internet Files
While deleting the cookies, history and website data can save some storage space on your Mac and cause Safari to run faster, you should be aware of a few potential complications before deleting this information:
- Deleting website data can log you out of websites that remember your login information.
- The first time you access a Web page after deleting website data, it may load slower than you are used to.
- Deleting browsing history prevents websites you frequently visit from auto-populating in the address bar as you type until you visit that specific website a few times.
- Deleting cookies can remove customization options and personal preferences that you set up on certain websites.