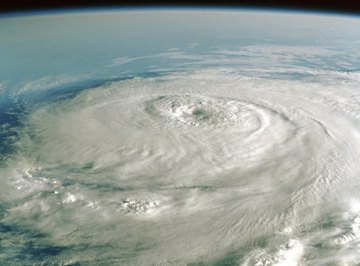
When storms form over a large body of water like the ocean, the water fights with the hot and cold fronts. This sometimes produces a hurricane. The swirling motion of the water creates a vortex that spins, and causes strong wind speeds from 75 to 155 miles per hour. When instructing students on the formation of hurricanes and tornadoes, many teachers create a three-dimensional model of a hurricane. Creating a model of a hurricane is a simple process that anyone is capable of making using a few simple household products.
- 2 two liter plastic bottles
- Water
- Blue food coloring
- Rubber hose repair tape or Tornado Tube
Add more visible effects to your hurricane model by adding a tablespoon of colored glitter to the water before connecting the bottles together.
Do this demonstration outside or over newspaper because it may leak. Blue food coloring leaves stains.
Do not leave the bottle in the sun for long periods of time. The fluid expands from the heat, and the bottles might burst or leak.
Fill one two-liter plastic bottle all the way to the top with water. Next, add a five drops of blue food coloring.
Sit the bottle on a flat surface. Pick up the second bottle, and turn it upside down. Place the opening of the bottle on top of the opening of the first bottle. Hold it firmly in place, and wrap rubber hose repair tape around the neck of the bottles. Wrap back and forth, so the tape holds the openings of the two bottles tightly together. This keeps the water in the bottle when you turn them. If you prefer, purchase a Tornado Tube from any school supply store. Screw one two-liter bottle into each end of the Tornado Tube.
Turn the bottle over, and the water flows down through the bottle openings. As it flows into the empty bottle, it creates a vortex swirl that simulates how a hurricane looks. The water moves in the same way as a hurricane as it is forming. Let the water run through the bottle, and turn the bottle back over. The vortex forms again. Step a few feet away from the bottles, so you get a better view of the hurricane vortex as it spins into a hurricane’s cone shape.
Try experimenting with the bottles, and see if you change the swirl of the vortex. Try shaking the bottle before you turn it over. Try shaking it as you turn it. This shows how waves and water currents alter the vortex of a hurricane. Sit the bottles in a sunny spot so the water gets hot. Then turn the bottle over, and see how heat alters the vortex. Sit the bottles in a cooler full of ice or a refrigerator, and see how cold air changes the vortex.
Things You'll Need
Tips
Warnings
References
Tips
- Add more visible effects to your hurricane model by adding a tablespoon of colored glitter to the water before connecting the bottles together.
- Do this demonstration outside or over newspaper because it may leak. Blue food coloring leaves stains.
Warnings
- Do not leave the bottle in the sun for long periods of time. The fluid expands from the heat, and the bottles might burst or leak.
Photo Credits
Ablestock.com/AbleStock.com/Getty Images