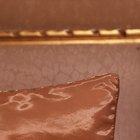
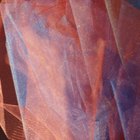
Delicate fabrics such as satin, are elegant and luxurious. Because of its fluid lines and draping ease, any designer finds this fabric tempting. You must handle it with care, though. Once you make stitch marks, it looks like the chances of restoring the fabric to all of it's original glory diminish. With a few simple steps, you will be able to mend your satin material and finish your creation as if you had made no markings.
Align your satin's exposed fibers made from your stitch mark punctures. Although stitch marks are minuscule, yo can see visible fibers. Place your fabric on your work surface and run your fingers along its naturally weaved grain.
Cut your clear patch in the size of the area that needs mending. If you are repairing a complete side seam, you will need to purchase several repair kits. Most manufacturers do not sell this item by the yard or strip.
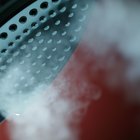
Turn over your fabric. If you are working with a garment, turn it inside out. Place the smooth side of the adhesive on the wrong side of your fabric or garment. Cover the area with a towel, fabric scrap or press cloth. You must cover the area to avoid damage to your iron or satin.
Set your iron on the "wool" setting. Press the iron approximately 10 to 15 seconds. Do not glide the iron. If you are mending a large section, lift your iron and press onto the next section. You will overlap sections with the iron.
Flip the fabric over and repeat. Cover the right side of your fabric with your towel or press cloth and press for another 10 to 15 seconds.
Check the bond of your fabric. If the stitch marks are severe, flip the fabric over to its wrong side and repeat the process. If you are working with medium or heavier weight satin, press for approximately 15 to 30 seconds.
Related Articles

How to Attach an Embroidered Patch
How to Remove Wrinkles From Polyester ...

How to Iron Velour Clothing
How to Get Fuzz Out of Polyester
The Care of Plisse Fabric

How to Clean a Polyester Coat

How to Remove a Crease in a Silk Scarf

How to Delint a Sweater
How To Repair Nylon Fabric
How to Get Rid of Perspiration Stains ...
How to Get Cigarette Burns Out of Fleece
Can You Iron Out Wrinkles on Sheer ...

Care Instructions for Voile Fabric
How to Patch Small Holes in Polar Fleece
How to Close Up Needle and Thread Holes ...

How to Get Wrinkles Out of Rayon & ...

How to Fray a Jean Jacket
How to Iron Cashmere
How to Get Wrinkles Out of Chiffon
How to Unwrinkle Velvet
References
- "The Sewing Book"; Alison Smith; 2009
Writer Bio
Mercedes Valladares is the founder of M721Organics and has been an independent designer for over 15 years. Her work experience commenced during college with manufacturers based in New York and Hong Kong. Her education includes LIM College, International Fine Arts College and design certification from the Paris Fashion Institute. She produces eco-crafting videos and writes recycling articles online.