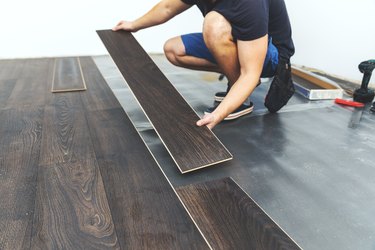
When installing hardwood or laminate floors, you generally follow the line of the most prominent wall, but there's a problem with this approach. It's rare to find a room that's perfectly square, so the wall opposite the one you choose for the first row is probably angled with respect to it. If you simply lay the planks parallel to the first wall, you'll have to cut angled boards on the other side of the room. If the difference in square is significant, the floor looks bad.
You can't make the room square, unless you want to rebuild it, so the best approach is to split the difference and leave angles on both sides of the room. You may luck out and be able to hide the angled gap with the baseboards. When installing laminate floors in an unsquare room, the approach is the same as it is for engineered or solid hardwood flooring.
Video of the Day
Video of the Day
Why Squaring the Room Is Important
When a hardwood floor is not straight, it throws off the sightline of the entire room. The eye perceives the angle as disorder, and it's difficult to correct. Installing a hardwood floor is expensive, and money is poorly spent if it contributes to disorder in your house.
Squaring a room for tile or for laminate flooring is just as important, because both types of flooring have lines that run parallel to the walls. If your room is severely out of square, and you don't want to encounter this problem, consider installing something without lines, such as linoleum or carpeting.
Laying the First Row Against the Most Prominent Wall
After you install the flooring underlayment (as applicable), measure the distance between the walls parallel to the flooring at both ends of the room. If the room is out of square, which it probably is, one measurement will be larger than the other. Subtract the smaller from the larger, then take half of the difference. The first row of flooring should be this distance from the wall on the wider end of the room.
Mark this point on the floor with a pencil, then go down to the other end and make a mark a quarter inch away from the wall to allow for an expansion gap. Snap a chalk line between these marks, or use a laser square to pencil a line. Install the first row of flooring along this line. Now lay the rest of the floor, and when you come to the other wall, the angle will be the same.
Using a Laser Square to Lay the First Row in the Center
Many flooring professionals prefer to lay the first row down the center of the room, rather than laying it against a wall, if this is suitable for the type of flooring used. There are two benefits to this approach: It distributes expansion pressure more evenly, and the floor usually looks better. The technique is to lay one row, tap a false spline into the grooves of the planks, then lay another row with its tongues facing in the opposite direction.
To set the line for the first row, measure the distances between the walls parallel to the flooring at both ends of the room. Measure half of each distance from one wall to the center of the floor and make marks on the moisture barrier. Use a laser square to pencil a line between these marks, and nail down the first row with its tongue-edge against this line.