An asphalt driveway can develop many different problems over time. Some of the more common problems include crumbling edges, cracks, and holes and depressions. Resealing can fix some of these minor issues and can also help restore the appearance of the driveway. Simple repairs can be done easily by a homeowner, but more extensive work may be better left to an experienced contractor.
Fixing Cracks in an Asphalt Driveway
Video of the Day
Cracks are one of the most common problems seen on asphalt driveways. They can range in size from small cracks to very large ones, and if they aren't addressed, they'll lead to other problems down the line. Freeze/thaw cycles mean that water gets down in the cracks and causes expansion of the material, leading to bigger cracks, potholes and other problems over time. Even in warmer climates, cracks allow vegetation to get a foothold, which can look unsightly and can eventually cause damage if not removed.
Video of the Day
Patching cracks requires a bit of work, but handling this type of issue early can mean less work later. Smaller cracks make for a pretty easy DIY job. You can start a crack repair on an asphalt driveway by dislodging loose sections with a small screwdriver and blowing out the crack with an air compressor or a garden hose or pressure washer to make sure the filler will fully adhere to the sides.
If you are using water, be sure to let everything dry completely so water doesn't get trapped under the asphalt. Select an emulsion-based or similar crack-repair product made for asphalt. Some products pour in, and others are more like tubes of caulk. Add the repair material until it's level with the pavement and then let it dry completely.
Larger cracks often require a bit more labor to fix properly. For a larger repair, use a hammer and chisel and wire brush to remove any loose pieces or a grinder if needed. Just like a smaller asphalt driveway repair, you'll need to spray or blow out any excess material to prep the surface and make sure it's free of any crumbs or loose pieces. Cold-process asphalt-repair products (such as blacktop repair) are often used for this type of fix. Apply the product with a trowel and compact the area thoroughly before letting it dry.
Very large cracks at a depth of 2 inches or more may also need to have the bottom filled with crushed gravel, which will then have to be tamped in soundly as a base. When applying the cold patch, don't fill this type of crack all at once but rather fill and compact it in multiple layers for best results. Again, be sure to let the fill material dry completely when the work is finished.
Patching Holes in an Asphalt Drive
While tending to cracks in an asphalt drive may be a fairly simple task, patching holes is usually a bit more involved. Typically, holes appear as the result of asphalt that has broken down over time, which means it will need more attention to restore the area to an improved condition. As with repairing cracks in asphalt, cleaning is critical to the hole-patching process for asphalt. Loose gravel, stones, dust and dirt will all hamper the process and result in a less-than-ideal repair job.
The challenge is making sure the fill that is used will be stable, which often requires a bit of evaluation as well as multiple steps and materials. Smaller holes might be fairly easy, with a quick fill of blacktop that is thoroughly tamped. These can go fairly quickly. For super-deep holes, a gravel or sand and gravel base may need to be added prior to pouring the fill material. The sides of the hole and surrounding area must also be evaluated to make sure the patch will hold well.
Many of the popular DIY pothole fill materials should be applied in layers rather than all at once to help the product hold better. If there are just a couple of holes to fill, you can get away with using a 4x4 post to compact the product, but for larger areas, an actual tamper is probably worth the investment. Asphalt will settle, so it's very important to make sure any product used is tamped down well in a repair project.
A dip or depression in the asphalt can collect rain. These areas can be filled much the same way as a pothole. To repair a dip or depression, first clean and prep the surface, fill, tamp and let dry. For all of these repairs, be sure to overfill the patched area and tamp down thoroughly until it is level. How well this is done will be reflected in how long the area will hold up to weather and wear and tear. It can also be helpful to select a finer cold-patch material for smaller areas and one that is more coarse to fill larger holes.
Addressing Crumbling Driveway Edges
Since asphalt driveways aren't formed the same way as concrete, the edges tend to break down more easily over time. This can result in a sloppy look, random pieces of broken asphalt in the lawn and a problem that is a challenge—but not impossible— to fix. Of course, if the entire edge of an asphalt driveway is crumbling, it may be far easier to hire a professional to fix it. If it is a small section, the work can be done by a motivated homeowner.
As with other asphalt driveway repairs, cleaning the area is the first order of business. Remove loose dirt, weeds, crumbs, pieces of asphalt and anything else that is in the way. Use an asphalt cold-patch product to fill in the edge area and tamp it down. Another option is to snap a chalk line and use a cold chisel to remove loose material and create a straight edge where the asphalt was disintegrating. Larger areas may require a lot more digging and a more involved approach, so consider using a contractor for these jobs.
Sealing an Asphalt Driveway
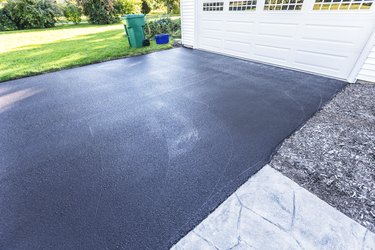
Resealing an asphalt driveway can help prevent future issues as well as maintain its overall appearance. Depending on the climate and the condition of the asphalt, this task should be done every one to three years. There are DIY options available at home improvement stores, and not a lot of specialized equipment is necessary to do the job. With all that said, it can be a labor-intensive undertaking.
The hardest part of the work is preparing the driveway properly, and this is an important step. If it is not done correctly, the sealer won't adhere properly to the surface. A good cleaning and rinsing will help ready the asphalt, but it must be done thoroughly, which can be time consuming. Sweep or blow debris off the surface and then power wash or scrub thoroughly with a stiff-bristled broom to remove ground-in dirt and loosen gravel and other materials. Be sure to rinse well.
Once the driveway surface is prepped, stage the driveway with buckets of sealant to reduce the need to walk over a freshly sealed area. Pour a coat of the sealant and spread it out with a squeegee or broom and then leave it to dry before the next coating is applied. When you are finished, the driveway will need 48 hours to fully dry, so this is a multi-day project.

DIY or Professional Help?
Deciding whether to take on a DIY reseal job on an asphalt driveway can be tricky. For asphalt driveways that are in decent shape with small cracks, it can be a real savings to do the work yourself. As a matter of fact, a good resealing will often take care of the very tiny cracks, preventing them from opening more later on. However, if the driveway has multiple large holes, disintegrating edges, extensive alligator cracking or other major issues, an entire new driveway may be needed.
For jobs that are somewhere in between, try to estimate the extent of the preparation to decide whether or not to tackle the job or go with a pro. Get a quote from local companies to see what the cost would be to hire out the work. The National Asphalt Pavement Association recommends getting at least two bids for the job.
Consumer Reports and other organizations warn homeowners about scams that have been run when it comes to sealing driveways, where the coating is just an application of motor oil or another substance. This does nothing to help preserve the surface or to address issues like small cracks. Be sure to do some research and read reviews to vet the contractor before hiring for a reseal job to make sure the company is legitimate.
- Asphalt Sealcoating Direct: How to Repair a Blacktop Asphalt Driveway DIY Homeowner
- Asphalt - The Magazine of the Asphalt Institute: Preventing and Repairing Potholes and Pavement Cracks
- Consumer Reports: Blacktop Patch Is Ideal for DIY Driveway Repair
- Consumer Reports: Sealcoating: Don't Be Scammed by a Drive-by Driveway Sealcoating Job
- National Asphalt Pavement Association: Driveways