Building a deck can be a very involved and complex project, especially if the deck is elevated high enough to require railings and stairways, and when it is attached by a ledger board directly to the structure of your home. Decks of this sort are subject to all kinds of building codes, and to be in compliance with the law you must apply for a building permit and have the structure inspected at different points during the construction. This kind of attached structure requires deep concrete footings that extend down below the frost line, which can extend to 4 feet or more in a colder climate. Building an attached deck, in other words, is a major project that requires fairly advanced skills.
But the process becomes much simpler if you build a low-lying, ground level deck that is free-standing, or "floating." This kind of deck serves more like a patio than a traditional deck, and because it requires no railings or stairways, and because it is free-standing and not anchored permanently to your home, it is not regarded by law as an extension of the permanent structure. In most areas, this means you can build this kind of deck without any permits or inspections.
Video of the Day
Video of the Day
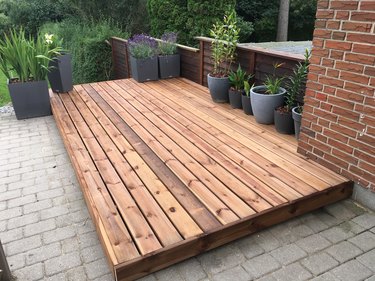
Floating Deck Construction Basics
Instead of deep concrete frost fittings and sturdy posts, this type of deck rests on simple concrete piers, or "deck blocks," that are available at any home improvement center. The tops of the piers have cross slots into which support joists rest. The only difficult part of the construction is making sure the piers are properly aligned and perfectly level before you install the support joists. The piers are formed so that you can also insert short vertical posts on top of the piers, to which the horizontal joists are attached. If you go this route, the posts must be relatively short, and the overall height of the deck can be no more than 30 inches above the ground. Higher than this, and your deck will require railings.
The instructions below will outline the construction of a very basic rectangular or square deck in which the horizontal joists will rest directly on the floating concrete piers. In order to keep the deck quite low to the ground, we are using 2 x 6 lumber for the underlying joists and also for the perimeter rim joists. For the surface decking, you can use a variety of lumber, as you prefer. Cedar decking boards are a favorite, but you can also cover your deck with composite decking for better durability.
How To Build a Freestanding or Floating Deck
Step 1: Start a Deck Plan
The first phase is planning. Using grid paper with an easy-to-interpret scale, sketch out your yard and a location for your deck. An easy scale to use is 1 square = 1 foot. Your deck will be easier to build if you choose a relatively flat spot in your yard, since sloped or uneven ground will mean a lot of digging and excavating. Use a dotted line to represent the outer perimeter of your deck in your sketch. In our example, we are building a very simple 10 ft. x 10-ft. deck.
Step 2: Draw Deck Joists
Next, sketch in a center joist to run down the middle of your deck. Then, sketch joists running every 18 inches (three grid squares) in both directions from the middle joist. The last joists can stop as much as 6 inches from the edge of the deck. It's fine for the surface decking to overhang these last support joists by a few inches. In fact, this is preferable, because it will allow the concrete support piers be recessed slightly from the edge of the deck, hiding them from view.
Step 3: Mark the Support Piers
Now, sketch in the position of the support piers underneath the joists. With the 2 x 6 joists we are using, we recommend that there be pier supports spaced no more than 4 feet apart to make for a very sturdy deck structure. Again, it's fine for the ends of the joists to slightly overhang the outer piers. This kind of construction is called cantilevering, and it is acceptable for the joist to overhang the piers by as much as 2 feet. In our 10 ft. x 10 ft. example, each joist is supported by three piers, with the joists overhanging the outside piers by 1 foot.
Step 4: Draw the Rim and Outer Deck Joists
The next planning step is to sketch in the outer joists. The outer joists that butt up against the ends of the support joist are called the rim joists. The other two joist that run parallel to the support joists are simply known as outside joists. Because the deck is floating at ground level, the rim joists and outside joists will hide the concrete piers so they don't show at all. All these joists will be made from 2 x 6 pressure-treated lumber.
Step 5: Lay Out the Decking Boards
Now, determine how many surface decking boards you will need. There are several different products you can use, including cedar 1 x 6 decking boards or 1 x 6 synthetic composite decking boards. Some math is required here, since the actual dimension of 1 x 6 boards is really about 5-1/2 inches. But you also want to install them with 1/4 inch between the boards for drainage. In effect, this means you will install a decking board about every 5-3/4 inches across the deck structure. For our 10-ft. square deck, this means we'll need 21 decking boards, but you'll have to work out the math yourself for your particular deck.
Step 6: Order the Deck Materials
The final planning step is to make a list of materials you'll need and place your order with the building supply center. In our example, our 10 ft. x 10 ft. deck requires seven 2 x 6 support joists 10 feet long; four joists to serve as the rim joists and outside joists (also 2 x 6s that are 10 feet long); 21 concrete piers; and 21 decking boards (1 x 6s). It will be easiest to order this material all at the same time for delivery from the home center, but you can, of course, transport the material yourself if you have access to a suitable truck or trailer. It is always best to order just a little extra in case of mistakes. In our example, ordering one extra 2 x 6 and at least one extra decking board would be a good idea. It's much better to have just slightly too much material on hand than to be forced to run back to the home center unexpectedly.
Step 7: Begin the Excavation
The next phase is to prepare your building site. This process means staking out the deck outline in your yard, and removing the sod and making a shallow, flat, and level excavation on which to rest all the concrete piers for your deck joists. Outline your excavation on your lawn using stakes and strings. Make the outline about one foot larger than the deck in both directions, to give yourself room to make the excavation. Remove all the sod, using a shovel.
Step 8: Level the Excavated Area
Use a garden rake to level the site as much as possible. This likely will involve removing some of the soil in the area. This is fine, since the goal is for the top of the concrete piers to be no more than 2 inches or so above the level of the surrounding lawn. Periodically use a long 2 x 4 and a 4-ft. level to check the excavation site for level.
Step 9: Add Landscape Fabric
When you are satisfied that the excavation site is as flat and level as you can reasonably make it, cover the area with sheets of landscape fabric, overlapping the sheets by six inches or so. The landscape fabric is not mandatory, but it will keep weeds from going up from beneath your deck. You can weight down the landscape fabric with bricks or stones.
Step 10: Place the Support Piers
Position the concrete piers in rows, following your planning sketch. Don't worry about perfect precision at this point—you will be doing some fine-tuning as you position the support joists across the piers.
Step 11: Position the Joists
Now comes the enjoyable part: building the deck. If you have sketched accurately during the planning stage, your sketch will be an easy-to-follow map for construction. Cut a 2 x 6 joist to the desired length, then position this as the center joist across the center row of piers, fitting the edge of the board into the slots in the piers. Check the spacing between the piers, and make sure the overhang on both ends of the joist is about the same. Then position the next joist on either side of the center joist in the adjoining rows of piers, measuring to make sure the spacing between the joists is 18 inches. Continue positioning the joists in the remaining rows of piers. Measure all spacing, and make adjustments to the concrete piers as needed.
Step 12: Install the Rim Joists
Cut the first rim joist to length, and attach it across one end of the upright joists, using 3-inch decking screws driven through the flat face of the rim joist and into the edge grain of the upright joists. A helper is useful at this point to hold each joist perfectly upright as you drive the screws. Continue attaching the rim joist to the end of each upright joist, using three screws for each joist. Once the first rim joist is attached, move to opposite side and attach another rim joist to the opposite end of the joists.
Step 13: Install the Outside Joists
Now attach the outside joists—the ones parallel to the upright joists—securing them at the ends to the rim joists. These outside joists will be connected only at the ends at this point, but once the decking boards are secured to the tops of the outside joists, the structure will be very sturdy. Check the alignment of all the piers, and make any final adjustments that are necessary.
Step 14: Square the Frame
Check to make sure the entire framework is square. The easiest way to do this is by measuring the diagonals. If the diagonal measurements are the same, the framework is square. If necessary, you can shift the entire framework by hand to square it up before beginning the surface decking installation.
Step 15: Install the Decking
Now begin cutting and fitting the surface decking boards across the top of the joist framework. Run the decking boards perpendicular to the support joists, fully covering all the joists, including the rim joists and outside joists. Use two 2-inch decking screws to secure each board at each joist location. Leave a 1/4-inch gap between each decking board to allow for drainage. If the last decking board does not fit perfectly, you can rip it down to the proper width with a circular saw.
Step 16: Stain the Wood
If your surface decking is cedar or another lumber, apply a sealer and/or stain as desired. Synthetic composite decking boards require no finish.