Things You'll Need
Tape measure
Pencil
Stud finder (optional)
Chalk line
Builder's level
Utility knife
Work gloves
Safety glasses
Hammer
Pry bar
Electric drill
Circular saw
Reciprocating saw
Wire cutters
Whether adding a new entrance to your home, access to an exterior deck or improving egress, the new door requires an opening in the home's exterior wall. This methodical approach to cutting the opening minimizes demolition and prepares the opening for the necessary wall framing for the new door unit.
For structural purposes, when planning the new door's location, keep the edge of the door a minimum of 12 inches from any building corner or window and 6 inches from any perpendicular interior wall.
Video of the Day
Interior Wall Preparation
Step 1
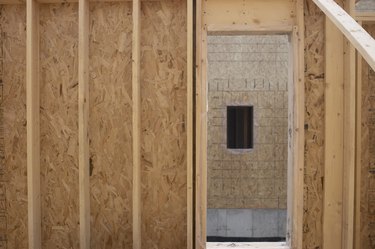
Mark the location of the proposed door opening on the interior of the wall. Locate the nearest wall stud to the left and right of the proposed opening and mark these stud's center lines.
Step 2
Use a builders level to complete a continuous vertical line from the floor to the ceiling at each of the stud centers determined in Step 1.
Step 3
Use a utility knife to cut the length of the lines marked in Step 2 and remove the sheetrock from the interior wall to expose the wall framing. Enlist the services of a licensed electrician to reroute any wiring encountered in the new opening.
Step 4
Remove wall insulation from the exposed opening and put aside for reuse around the new exterior door.
Step 5
Mark the new door's rough opening width on the bottom plate of the wall framing. Follow door manufacturer's specifications to determine the rough opening required.
Step 6
For homes with wood exterior siding, continue to Section 2. For homes with exterior stucco, continue to Section 3.
For Exterior Wood Siding
Step 1
At the lower right hand rough opening line marked in section 1, Step 5, just above the bottom plate, use a ¼-inch drill bit to drill a hole horizontally through the exterior siding. Repeat this procedure at the left side rough opening line.
Step 2
From the outside of the exterior wall, use a builders level to mark a plumb line vertically from holes drilled in step 1. Mark a level horizontal line 2-inches below drilled holes to define the bottom of the new opening. Measure the top of the door's rough opening height from the bottom line and mark a level horizontal line to complete the perimeter of the cut line for the opening.
Step 3
Use a circular saw to cut the layout line around the perimeter of the opening and remove the siding pieces. Be sure to set the depth of cut for the saw blade to the thickness of the exterior siding and, if applicable, the plywood sheathing beneath.
Step 4
With the siding removed, use a hacksaw or reciprocating saw with a metal-cutting blade to cut through the nailing at the base of each wall stud within the wall opening and remove. Cut off any nails that are exposed at the top plate of the wall or the inside surface of the exterior siding.
Step 5
The opening is now ready for installation of the wall framing for the new door.
For Exterior Stucco
Step 1
At the lower right hand rough opening line, just above the bottom plate, use a ¼-inch masonry drill bit to drill a hole through the plywood sheathing and exterior stucco. Repeat this procedure at the left side rough opening line.
Step 2
From the outside of the exterior wall, use a builder's level to mark a plumb line vertically from holes drilled in Step 1. Mark a level horizontal line 2-inches below drilled holes to define the bottom of the new opening. Measure the top of the door's rough opening height from the bottom line and mark a level horizontal line to complete the perimeter of the cut line for the opening. Use a chalk line to connect the marks and define the cut line for the opening.
Step 3
Using a circular saw with a masonry blade, cut the layout line around the perimeter of the opening. Be sure to set the depth of cut for the saw blade to the thickness of the stucco only.
Step 4
Use a pry bar and hammer to detach the stucco from the plywood sheathing beneath. Stucco is applied over a wire mesh and removal will require cutting this mesh with wire cutters as the pieces of stucco are broken to remove. For protection, wear work gloves and safety glasses.
Step 5
With the stucco removed, use a reciprocating saw to cut the plywood sheathing around the edge of the opening and remove.
Step 6
Use a hacksaw or reciprocating saw with a metal-cutting blade to cut through the nailing at the base of each wall stud within the wall opening and remove. Cut off the nails that are exposed at the top plate of the wall or the inside surface of the plywood sheathing.
Step 7
The opening is now ready for installation of the wall framing for the new door.
Warning
Consult a licensed electrician to relocate or reroute any wiring or fixtures encountered in the wall framing of the new opening.
Video of the Day