Things You'll Need
1/4 inch bow shackle
2 pieces of paracord (each 3 feet long)
3/16 inch bow shackle
Fabric tape measure
15 feet paracord
2 pieces of dental floss (each 12 inches long)
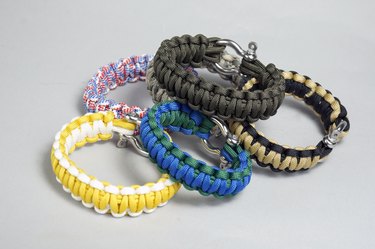
Literary figures from the Hobbit to Tarzan all know that you don't venture into the wild without a bit of rope. Here's a project that will make sure you have about 13 feet of versatile parachute cord all the time, whether your jungle is real or the urban kind. The bow shackle closure might come in just as handy as the paracord, should you need to rig a rain fly, set a snare or hoist a load.
Step 1

These instructions focus on a minimalist approach, using just an extra bow shackle and some scrap paracord to support the weave. Please see the last slide for an itemized list of tools and materials.
Video of the Day
Step 2
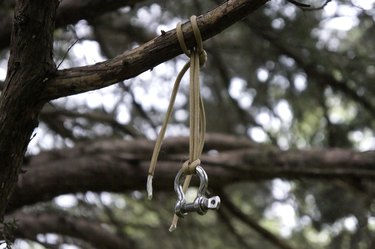
Tying a paracord bracelet requires a way to tighten strands of paracord between two points while allowing the length to be adjustable. This method can get you going just about anywhere, even in the woods. Use an overhand knot to make a loop out of one 3 footlong piece of the paracord. Slide the loop through a 1/4 inch bow shackle and then back through itself. Throw the loop over a branch, and slip the bow shackle through the loop, securing it to the branch.
Step 3
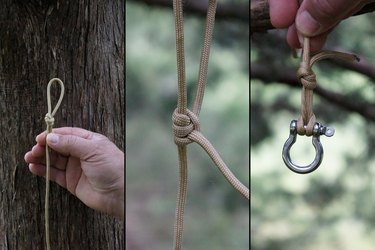
Use an overhand knot to make a loop in one end of the second piece of paracord. Tie the other end to a branch about two feet below the first using a taut line hitch. To tie a taut line hitch, take the working end of the line and wrap it twice around the standing end (long piece), working toward the branch. Now bring the working end back across the two wraps and make a third. Bring the working end tight. The knot should slide along if you push it, but not move when you pull on the loop in the other end. Secure the 3/16 inch bow shackle that will be part of the bracelet to the loop in the lower cord by pushing the loop through the bow and then around the pin end.
Step 4
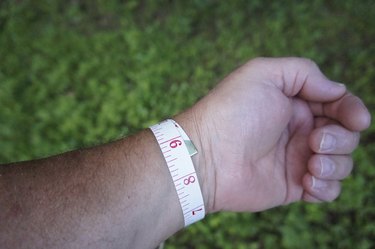
Wrap a fabric tape measure around your wrist. Add 1 inch to account for the bow shackle (and to allow for some wiggle room), and another 1/2 inch for loss of length in the weaving process. So, if your wrist measures 8 1/2 inches, set up the core in the next step to 10 inches.
Step 5

Measure and cut 15 feet of paracord. Locate the center and slip it through the 3/16 inch bow shackle (the smaller one, that is part of the bracelet). Bring the working (loose) ends through the loop, securing the paracord to the bow shackle. Bring the working ends up to the pin in the 1/4 inch bow shackle at the top of the workstation, loop over, back to front, and take them back down to the smaller bow shackle. Loop them through the lower shackle and pull them back toward the larger shackle. Adjust the taut line hitch until the distance between the pin in the lower shackle and the pin in the upper shackle matches the measurement calculated earlier.
Step 6
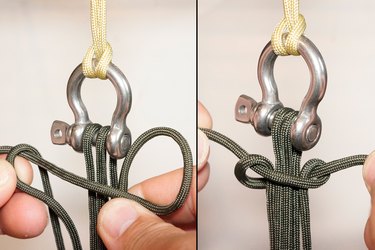
This is the toughest step in the whole project, so be patient. Pull the working ends up to but not through the bow shackle at the top. You should now have six strands of cord, four lines through the shackles and your two working lines. Make a big loop in the right line, with the working end crossing the front of the core. Bring the left line over the right line, behind the core and out through the big loop. Pull both lines to tighten.
Step 7

Push the knot up relatively tight to the 1/4 inch bow shackle. Make sure the core lines are even, and double-check your measurement pin-to-pin. When it is all nice and even, tight and the length is correct, the tough part is over. However, after the next knot, adjustment is nearly impossible without untying back to this point.
Step 8
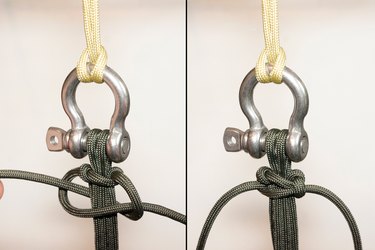
Starting from the left side this time, make a big loop, with the working end crossing the core. Take the right line over the left, behind the core and out through the loop. Pull both lines to tighten. Repeat starting from the right side. Continue this pattern, alternating from left to right.
Step 9
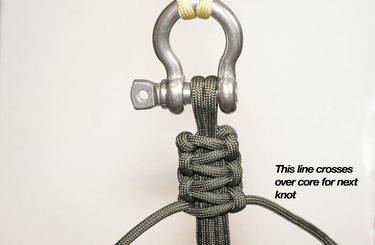
If you're interrupted mid-bracelet making, the side with the lowest finished loop complete is the side where you will make the big crossing loop. Keep your tension consistent throughout. Tight weaving yields a firm bracelet that holds its shape. A looser weave results in a softer feel, but is more likely to unravel.
Step 10
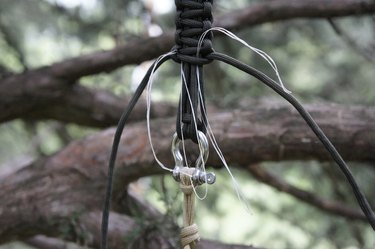
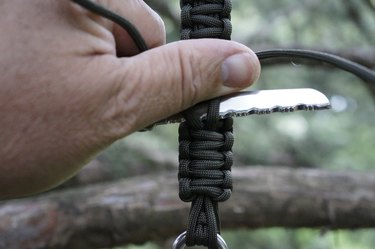
When you have about 3 knots left to go, take the two pieces of dental floss and make large loops out of them, with overhand knots. Slip the two dental floss loops into the weave so that they hang an inch or so below the end. With each of your last few passes, make sure the dental floss stays aligned with the core lines and slides easily. You're going to pull the working ends inside the finished weave, so don't tighten the last few knots too tightly. When you've tied right up to the bow shackle, take the bracelet off the workstation and try it on.
Step 11

When you're happy with the appearance of the weave and the bracelet fit, cut the ends off about 5 inches from the bracelet. Put one of the working ends into one of the dental floss loops and pull the floss so that the working end threads into the middle of the weave. Repeat with the other working end. Before you pull the working ends completely through, tighten up the last two knots in the weave.
Step 12
Push the last few knots up the core, compressing them slightly. Pull the ends all the way through and tight. Cut the excess cord off close to the weave. Take care not to nick the weave. Push the last few knots back toward the bow shackle and the cut ends will disappear into the weave.
Step 13
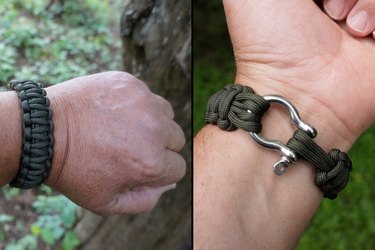
Once it is woven, the bracelet will have the same appearance from either side. The only subtle difference is that one side has the ends pulled into the weave. The ends are less likely to show or work loose if the bracelet is worn with that side toward your wrist. Align the bow shackle so that the handle points up your arm rather than toward your hand -- it will be more comfortable.
Step 14
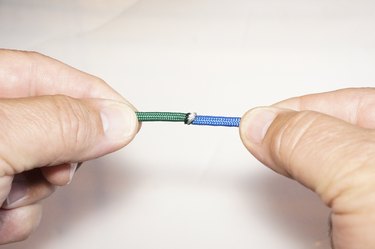
The two-tone bracelets in the opening slide are made exactly the same way. Take two 7 1/2 feet pieces of paracord, melt the ends and press them together. However, if you have to use the cord, don't rely on the fused joint to hold any weight. Consider that you have two short pieces of cord, not one long one.
Tip
If you're not working in the woods, two bookshelves 2 feet apart, or virtually any two points can secure the upper and lower supports.
Video of the Day