
The Basics of a Rocket
A rocket is a device that channels explosive force to create thrust. Generally, the rocket consists of a fuel or propellant stored in a secure container, usually a cylinder. The cylinder must be open only in one direction, so as to let out the explosive force of the fuel when it is ignited. Modern rockets have a nozzle, which directs the explosion of the rocket in one direction. The easiest way to think of rockets is that they are all simply controlled explosions. Because the explosive force wants to escape the rocket, it travels out the nozzle and propels the entire rocket in the opposite direction of its travel.
How a Rocket is Constructed
Rockets now are so diverse that it is impossible to classify their construction in a single method. However, they all have some similar construction properties. Most rockets are made by machines. This eliminates the possibility of error. Because a rocket must control a very powerful explosion, it has to be able to withstand the force of that explosion as well as direct the explosive power in only one direction. This means that the rocket must be made of a material that is fitting for the explosive force that will be released. For instance, very small rockets found in small model rocketry activities have only a small plastic or cardboard casing to contain their explosion. As the size of rockets increases, more durable materials are used such as aluminum and steel. All rockets must also have a nozzle that can be bolted, glued or otherwise affixed to the cylinder. The nozzle is usually created from very durable material and can be even tougher than the cylinder itself. This is because the nozzle is very small and has the brunt of the explosive force placed upon it. Depending on the use of the rocket, the nozzle may be widened or decreased in size. Decreasing the diameter of the nozzle will cause the propellant to burn with less force, but longer duration. Conversely, a wider nozzle will cause a shorter burn with more force.
The Propellant
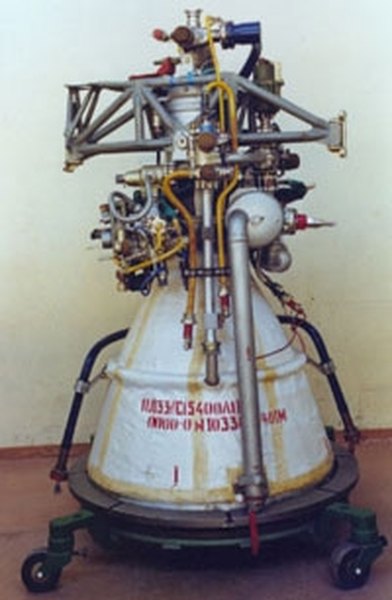
Rocket propellant can be either in liquid or, more commonly, solid forms. Solid propellant includes mixtures such as gunpowder, while a liquid propellant could be something as simple as gasoline. Solid mixtures are relatively simply to handle and are simply deposited inside a rocket cylinder during its construction. Liquid propellants, on the other hand, are a bit more complicated in use. All liquid propellant rockets need a liquid fuel as well as an oxidizing agent to facilitate ignition. Liquid propellant rockets look nothing like solid propellant rockets, as they necessitate very intricate tubing and pressurizing. As the picture of a liquid propellant rocket shows, they are elaborate in design and usually use a system of pumps and valves to mix the liquid propellant and oxidizing agent in a controlled manner. When the two are mixed and ignited, the rocket is active and produces thrust. The advantage of a liquid propellant rocket is that the thrust is controllable by how much propellant is allowed to ignite at a time.
References
About the Author
David Scott has been a firefighter for the Seattle Fire Department's Technical Rescue Team for almost 20 years. He has been writing primarily since 2005, but did author the book, "The White River Ranger District Trail Guide" in 1988. In addition to his work for Demand Studios, Scott spends much of his time writing poetry and a novel.
Photo Credits
www.chem.hawaii.edu