
How to Wire an Electric Motor to run on both 110 and 220 volts
This procedure works for electric motors that are able to operate with either 110 or 220 volt power by changing a few wiring connections. I use this for my table saw that I use in different locations to quickly change the motor to run on either voltage.

The idea is to have the differing connections for HIGH and LOW voltage already made within a pigtail which can be quickly changed.
Things You Will Need
- Electric cord (3 wire)
- Junction box and cover
- Plugs and sockets
- Screwdrivers
- Wire cutters/strippers
- Wire nuts
Tip
If your motor has more than 6 wires, a 4-wire cable and 4-pronged plug/socket can be used.
Warning
Always use caution working around electrical equipment! Double check all connections before operating. Label or color code each plug/socket pair and the pigtail as a whole so the motor will only be operated with the associated pigtails. Train others who use the equipment how to connect the pigtails.
-
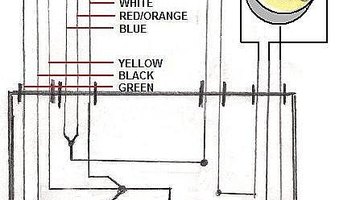
Check your motor for a wiring diagram for either LOW or HIGH voltage operation and locate where the connections need to be made.
-
My motor has a box on the side with 6 colored wires, plus a green wire for the ground. The diagram shows the red and orange wires common to both HIGH and LOW voltages, so I connected these at the motor and treated them as one wire.
-
FOR 220 (HIGH) VOLTAGE OPERATION:
-
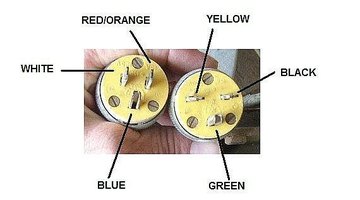
Using 2 lengths of cord (6 wires total), connect one wire of each cord to each of the colored wires. Attach a MALE 110 VOLT plug to one cord and a MALE 220 VOLT plug to the other. It doesn't matter to which cord the plugs are attached, as long as they match up to their mating socket as explained in the following steps. Since the red/orange wires are connected to only one of the cord wires, the 6th cord wire is used as the ground wire.
-
Mark which wire is connected to each prong of the plugs.
-
FOR 220 (HIGH) VOLTAGE OPERATION:
-
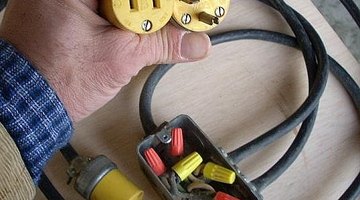
This is the pigtail that connects the motor to the power source. I have one for 110 volts and one for 220. The different connections for LOW and HIGH voltages are made inside the junction box instead of the box on the side of the motor. It has 4 cords; 2 to connect to the motor, 1 for power and 1 for a switch. All plug/socket combinations are different so they cannot be interchanged.
-
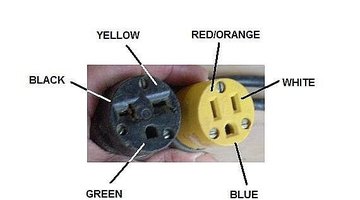
Cut 2 lengths of cord and attach a FEMALE 110 VOLT socket to one and a FEMALE 220 VOLT socket to the other.
-
Again, mark each wire as both sockets mate to their corresponding plug on the motor. Feed the cord through the junction box and clamp in place.
-
Cut 2 more lengths of cord, attach a MALE 220 VOLT plug to one cord for power and attach FEMALE 110 VOLT socket (without a ground terminal) to the other cord for a switch. Then clamp the other ends to the junction box.
-
Attach a MALE 110 VOLT plug (without a ground prong) to the switch cord on your piece of equipment.
-
Make the connections inside the junction box according to the wiring diagram for HIGH voltage operation. Connect the two wires for the switch in line with one of the power (line) wires. For HIGH voltage, both power lines are energized so either one can be used for the switch.
-
FOR 110 (LOW) VOLTAGE OPERATION:
-
Fabricate a second pigtail in the same manner as above substituting a MALE 110 VOLT plug for the power cord (Step 7) and making the connections inside the junction box according to LOW voltage operation according to the wiring diagram (Step 8).
-
Connect the two switch wires in line with the wire connected to the LEFT prong of the plug when looking at the plug (as in picture). This prong inserts into the right slot on an outlet which is energized.
-
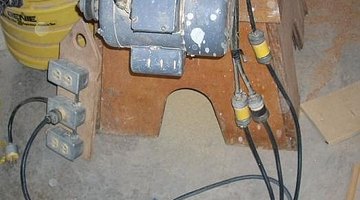
Here is the motor and high voltage pigtail as installed on my table saw. If another location only has 110 volt power available, I simply use the 110 volt pigtail.


The Drip Cap
- This procedure works for electric motors that are able to operate with either 110 or 220 volt power by changing a few wiring connections.
- The diagram shows the red and orange wires common to both HIGH and LOW voltages, so I connected these at the motor and treated them as one wire.
- Attach a MALE 110 VOLT plug to one cord and a MALE 220 VOLT plug to the other.
- The different connections for LOW and HIGH voltages are made inside the junction box instead of the box on the side of the motor.
- It has 4 cords; 2 to connect to the motor, 1 for power and 1 for a switch.
- Then clamp the other ends to the junction box.
- FOR 110 (LOW) VOLTAGE OPERATION: Fabricate a second pigtail in the same manner as above substituting a MALE 110 VOLT plug for the power cord (Step 7) and making the connections inside the junction box according to LOW voltage operation according to the wiring diagram (Step 8).
Writer Bio
This article was written by PocketSense staff. If you have any questions, please reach out to us on our contact us page.
Photo Credits
- txron
- txron
More Articles