How to Make a Frame for a Hoist
by Grahame TurnerHoists are powerful lifting devices capable of raising the engine of a car, for example. However, to actually function, a hoist needs to be placed on a frame. A sturdy hoist frame isn't too hard to build out of some existing materials. The process is similar to building a swing set, but with some modifications to allow the frame to support immense weights. A wooden frame is capable of carrying an engine block.
Step 1
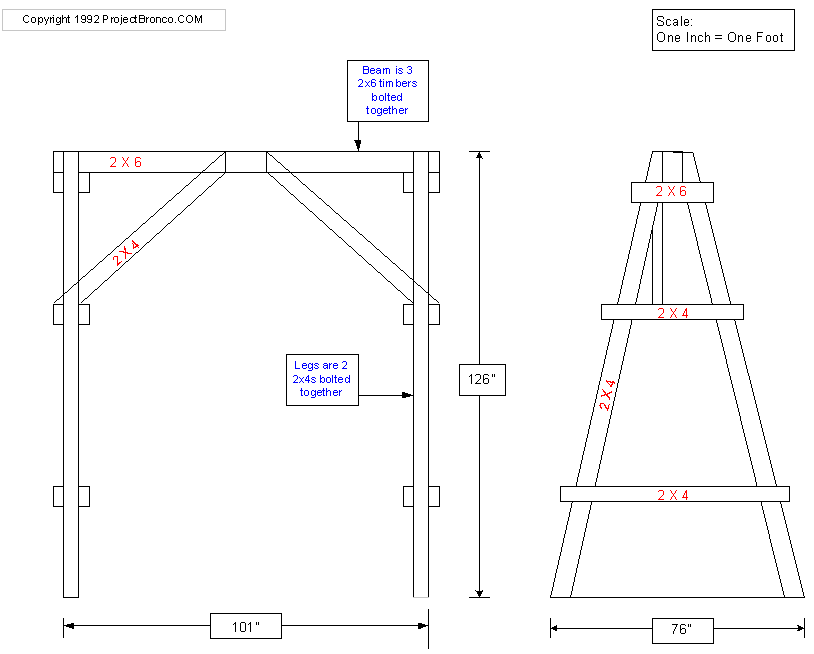
Place the three 2-by-6 planks together, so they create a 6-by-6-inch beam. Glue the planks together. Clamp the beam down.
Step 2
Use a drill bit marginally wider than the 7-inch bolts. Drill all the way through the beam, then push the bolt through and screw the nut into place. Repeat with the other 7-inch bolts, spacing them evenly along the beam.
Step 3
Lay two 2-by-4 planks on top of one another to make a 4-by-4 beam. Screw the planks together with 3-inch wood screws, then flip the piece over and screw from the other side. Repeat three more times to make four legs total.
Step 4
Arrange two legs to form the side of an A frame. The top-most corners of the planks should be about 6 inches apart, and the bottoms of the planks should be about 7 feet apart. Glue and clamp the beams together.
Step 5
Place a 2-by-4 across the bottom of the A frame, so that it meets with both outer corners of the A frame. Trace the bottom of this piece of wood with a marker.
Step 6
Cut off the bottoms of the wooden frame.
Step 7
Cut the remaining 2-by-6 pieces into four 2-foot planks. Place one of the 2-foot pieces about 6 inches below the top of the A frame and screw it into place with the wood screws. You need at least three screws on each side of the A frame.
Step 8
Place a 2-by-4 plank about a third of the way up your A frame. Line up the end of the 2-by-4 with the side of the A frame. Cut the excess beam off the end. Screw the beam into place.
Step 9
Place the excess beam from the previous step on the A frame toward the bottom. Cut off any excess wood. Screw this into place.
Step 10
Flip the A frame side over and attach a second set of cross beams. You need a 2-by-6 beam 6 inches from the top and two more 2-by-4 pieces along the side.
Step 11
Repeat the previous steps to make a second A frame side.
Step 12
Trace the end of the 6-inch beam onto a piece of cardboard. Cut out this template.
Step 13
Align the template so that it rests on the top of the 2-by-6 plank. Trace the template.
Step 14
Cut the excess wood to create a void inside the A frame where you will store the beam. Repeat the tracing and cutting with the other A frame.
Step 15
Slide the end of the 6-inch beam into the slot atop the A frame. The two pieces should be at a 90-degree angle. Screw the beam into place. Repeat with the other end of the beam and the other A frame.
Step 16
Hold a 2-by-4 plank at a 45-degree angle between the 6-inch beam and the middle 2-by-4 on the A frame. Screw this into place and trim off the excess.
Step 17
Attach your hoist to the middle of the 6-inch beam.
References
Tips
- If you have experience with welding and you have some metal tubes, you can also weld a frame into a similar shape to build one out of metal. Metal may be sturdier and may work for more massive objects.
Things You'll Need
- 3 wooden planks, 8 feet by 2 inches by 6 inches
- Wood glue
- Clamp
- Drill
- Drill bit set
- 6 bolts and nuts, 7 inches
- 8 wooden planks, 8 feet by 2 inches by 4 inches
- Marker
- 2 wooden planks, 4 feet by 2 feet by 6 feet
- Saw
- Box of 3-inch wood screws
- Cardboard
Warnings
- If your frame begins to creak or splinter, lower the hoist to remove the weight you are lifting. You are attempting to lift something too heavy for your frame and should try again with something sturdier.
Writer Bio
Grahame Turner has worked as a freelance writer since 2009 and a freelance reporter since 2010 for Wellesley Patch and Jamaica Plain Patch in Massachusetts. He also works part-time as a bookseller at the Northeastern University bookstore. He is a Northeastern University graduate with a Bachelor of Arts in English.


