A return air duct is one of the components of your forced air furnace that carries air back to the furnace after it is dispensed throughout the home through the supply duct. Without a return air duct, the air would not properly circulate and your energy costs would rise. Return air ducts usually use ceiling joist spaces as the actual "duct," which then runs back toward the furnace. These joist spaces empty into an actual duct that runs perpendicular to how the joists run and then down into the side of the furnace. With the right tools, you can install a return air duct successfully.
Things You'll Need
1-inch galvanized hanger strap
HVAC filter
Duct sealant
2-inch aluminum foil tape
Video of the Day
How to Install a Return Air Duct
Step 1: Determine Where the Ducts Will Go
Locate where you want your return air ducts. Cut a hole low in the drywall where you want to put your return air grille. If you are cutting new return registers into an existing house, take care not to cut any pipes or electrical wires in the wall when cutting the hole. Cut a small hole by hand to look inside the wall before proceeding. Size the hole appropriately to the grille size. Through the hole, cut through the floor. This should give you a hole into the basement ceiling joist space. Continue to repeat the step until you have the number of return air holes you desire. You should have at least one per room except for the bathroom.
Video of the Day
Step 2: Begin Adding Panning
Go into the basement and locate the holes. Work from the farthest hole back and install return air panning back toward where the furnace is. Nail the panning to the bottom of the ceiling joists. At the farthest hole, notch the panning to fit, bend it up and attach it to the floor to close off the space. By the furnace, stop all the panning in the joists at the same spot. Notch this side also and take it up to the floor. In a line perpendicular to the joists, cut holes in the panning. This will be how the air gets from the panning into the return air duct that will run to the furnace.
Step 3: Enclose New Ductwork
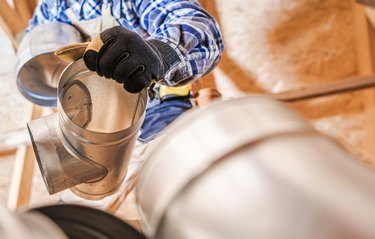
Install the square return air duct perpendicular to the joists. You want to run it so it covers up all the holes you cut in the panning. Cut holes in the top of the return air duct to match the holes in the panning. This allows the air to get into the return air duct. The return air duct is connected together using s-slips and drive cleats and should be installed tight to the bottom of the ceiling joists so it makes a tight seal with the panning. For better energy efficiency, you can insulate your return air duct with 1 1/2-inch foil faced duct wrap. This will prevent heat gain or loss as the air passes through your return air duct. Secure the duct to the ceiling joists with 1-inch galvanized hanger strap.
Step 4: Add New Air Return Duct to Furnace
Cut a hole in the bottom of the return duct next to where the furnace is. This is where you'll attach another duct that will run down and in to the furnace. Cut a hole in the side of the furnace that matches the size of your filter rack. Make the connections from the bottom of your return cut to your filter rack and attach to the furnace. Cut duct as necessary to fit.
Step 5: Install New Air Filter
Install your HVAC filter into your filter rack. Seal all joints and seams of the duct with a duct sealant and a cheap paintbrush for best energy performance.
Step 6: Install Return Air Register Covers
Screw all your return air registers over the holes that you cut upstairs. Your return air duct system is now complete.