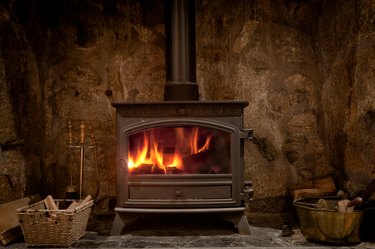
You've just bought a wood burning stove. You're looking forward to cozy winter nights with a crackling fire. First, however, you must get your wood stove set up properly. One of the most important parts of setting up your wood stove is connecting it to the stovepipe. A stovepipe can either be single wall or two walls for close clearance. A stovepipe will then connect the stove to a metal or masonry chimney. It is not to be used for passing through walls, floor or ceilings.
Video of the Day
Single or Double Wall Stovepipe
Single or double wall stovepipes are usually painted black, with paint that withstands high temperatures. Some manufacturers offer stovepipes in porcelain enamel colors that match the stoves. These come in two thicknesses, 24 gauge or 22 gauge. Single wall stovepipes should usually be kept at least 18 inches from any combustible wall, ceiling or furniture unless the combustible surface is protected with an approved method or there is a heat shield on the stovepipe. This may give you an additional 9 inches.
Video of the Day
A double wall stovepipe – or a clearance stovepipe – has a stainless steel inner wall and a black painted outer wall. The space in between serves as an insulating layer. This stovepipe can be installed as close as 6 inches to combustibles.
Installing Your Stovepipe
You will want to trim your stovepipe to size using tin shears or another cutting or grinding tool. Heavier gauge pipe will likely have adjustable slip joints, which will eliminate the need for trimming. After trimming your pipe, use black furnace cement to seal between each piece and three sheet metal screws at each joint. Then, attach the pipe to the stove and chimney pipe, making sure it is rigid and tight.
Chimney vs. Stovepipe
Do not confuse chimney pipe with stovepipe. A stovepipe is a connector pipe that is used in the interior of the home. Never use a chimney that is smaller in diameter than the flue size of the wood stove it's being connected to.
Installing Your Chimney Pipe
Once your stovepipe is installed, you'll need a Class A chimney pipe for your wood stove. Installing this pipe straight up and through the ceiling is the best and least expensive option. It will also draft better. Once you select your brand, you can connect it with additional piping from the same brand. Do not try to match one chimney pipe brand to another. This could be dangerous.
Start with a Class A chimney pipe, in diameters of 5 to 24 inches and lengths of 6 to 60 inches. You will need to determine where the chimney pipe will penetrate the ceiling. Using an insulated or double wall chimney pipe is best. A single-wall pipe will require 18-inch clearance to the ceiling, while double wall pipe needs an 8-inch clearance to the ceiling. A double-wall pipe needs a 12-inch clearance space. You will need to cut the opening to the roof to extend the chimney pipe. When calculating your chimney pipe size, subtract 1.5 inches for each joint overlap.
The stovepipe connects with the insulated chimney at a special support box located just below the ceiling level. The insulated chimney pipe is stacked until it reaches the required height. All chimneys must extend 3 feet above the roof surface and 2 feet higher than any part of the building within 10 feet. You should weatherproof the roof opening with an insulated storm collar and roof flashing. Otherwise, heat from your wood stove will flow out through the uninsulated opening.
You could also choose to exit your chimney pipe through a wall, using an angled elbow pipe, and extend it up above the roof along the side wall of the home. You can box the chimney collar in with wood framing and add stucco or siding to match the home's exterior. If your house has an existing masonry chimney, you can use this, but it will probably need to be relined with a stainless steel pipe. You should consult a chimney professional about this.