
An entire world of organisms too small to see with the naked eye is revealed in common pond water when it is placed under a microscope. Microscopes can allow people to catch a glimpse of this elusive world. Many children love to see these organisms and the experience of doing so can cultivate a great interest in science and biology. Parents and teachers can use pond water to show children that if they look hard enough, there are many things that make up our daily lives that we cannot see. Learning how to use a microscope to look at pond water is not a difficult task.
- Plastic container
- Eye dropper
- Microscope slides
- Slide cover slip
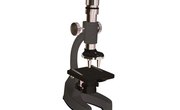
- Microscope
Collect the pond water. Obviously, pond water comes from ponds, but if there are no ponds nearby, water from a lake, river or stream will suffice (water from these sources will have many of the same organisms as pond water). Simply go to the water and collect a small amount in a lidded container. Seal the container with its lid, and take it back to the microscope.
Prepare the slide. Preparing the slide means to put the pond water onto a microscope slide in a way that it can be viewed through a microscope. First, suck up a small amount of the water in the container with an eye dropper. Then, carefully release the water onto a microscope slide. Once the water is on the slide, use a slide cover slip to cover it. This will spread the water out into a thin layer over the slide. Check to see if there are any air bubbles. If there are, carefully push them from beneath the slide cover slip.
Place the prepared slide securely into the microscope's viewing area. Then, activate the microscope's light source and look into the viewing mechanism. Use the dials on the microscope to adjust the focus and move the slide around. Most microscope controls are fairly intuitive, so it should not take long to adjust the microscope to the correct settings.
Things You'll Need
References
About the Author
Michelle Nickolaisen has been writing professionally since 2008. She is a freelance writer for various independent clients, specializing in travel and DIY household projects. Nickolaisen has an Associate of Arts in English.
Photo Credits
der fremde image by O.M. from Fotolia.com