
How To Give a Splatter Look With Oil Paint

If you like the abstract, grungy or messy look of art, you should try your hand at creating the splattered look with oil paints. Using the splattering effect with paint adds a whole different personality to a painting if you create a painting first with regular brush strokes and then add a top layer of splatters.
Things You Will Need
- Canvas
- Old newspapers
- Primer
- Oil paints
- Stiff-bristled paint brushes
- Turpentine or oil thinner
- Cups or small bowls
- Old tooth brush
- Fine-bristled paint brush
This technique of painting is fun, but also a little challenging because you have less control over where the paint lands on the canvas.
-
Cover your work area with old newspaper or bags.
-
Prime and paint the background of your canvas before applying the splattering effect. Usually the splatter look is done last, or a dark or more vibrant layer of splatters is added over a lighter, thinner bottom layer of splatters. You can also apply the splatters to a plain-white canvas.
-
Add the colors of oil paints that you want to splatter with into individual cups or small bowls. Thin the oil paint down with a thinning agent. Use a solvent like turpentine or an oil such as drying linseed oil or drying poppy seed oil -- note that the drying oils will cause your splatter designs to dry quickly. Slowly add a small amount to the paint and stir with a paint brush until you get the desired consistency for your splatters.
-
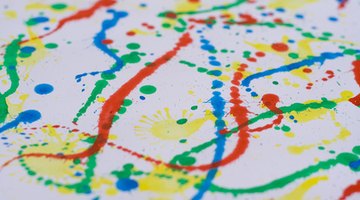
Dip a stiff-bristled brush into the thinned oil paint. Use a large brush with stiff bristles and flick your wrist toward the canvas in the spot where you want to add the splattered look. Add smaller sprayed areas with a small stiff brush or an old toothbrush by running your thumb along the brush while pointing it at the canvas. Create a fanned out splatter (rays going from one point) by gently hitting the canvas with a fine-bristled brush and letting it splatter out.
Tip
Experiment with different splattering styles on a piece of paper before doing them on a painted canvas.
Tips
- Experiment with different splattering styles on a piece of paper before doing them on a painted canvas.
Writer Bio
Angela Neal is a writer for various websites, specializing in published articles ranging from the categories of art and design to beauty and DIY fashion. Neal received her Associate of Arts in administrative assisting from Bohecker College.
Photo Credits
- splattered smeered and printed image by pdtnc from Fotolia.com
- splattered smeered and printed image by pdtnc from Fotolia.com
More Articles