The most common and urgent reason to remove and replace a shower drain is to repair a leak, which typically makes itself known by water damage to the drywall in the ceiling below the shower. You also have to replace the shower drain if you want to replace the shower pan or base, of course, and if your old shower drain is showing signs of corrosion, you might want to do it to forestall future leaks. The job, like many DIY plumbing tasks, is easier to describe than it is to do, due to corroded fittings and limited working space.
When a bathtub drain leaks, you can usually make the entire repair from inside the bathtub, but a shower drain isn't constructed the same way, so you should expect to have to cut into the ceiling below the shower to do a proper job or shimmy into the crawlspace under the bathroom, if it's on the ground floor. As any plumber who has ever replaced an old faucet knows, removing corroded fittings and tightening new ones to make them leakproof requires extra strength and dexterity when you don't have room for your tools, so you should give yourself as much room as possible by cutting the hole larger than you think you need. Don't worry — a large hole in a drywalled ceiling is no more difficult to patch than a small one.
Video of the Day
Video of the Day
The Parts of a Shower Drain
You'll find a variety of shower drains on the market. For example, the Oatey 42045 shower drain, illustrated by funbro1 on YouTube, consists of a plastic housing that you glue onto the waste pipe and a plastic strainer assembly that you screw into it. The Oatey 42150 is the most common model for fiberglass, acrylic and other preformed shower bases, and it comes in brass or plastic. You don't glue this to the waste pipe, so you can replace it without cutting any pipes and potentially having to glue on a pipe extension or replace the entire P-trap.
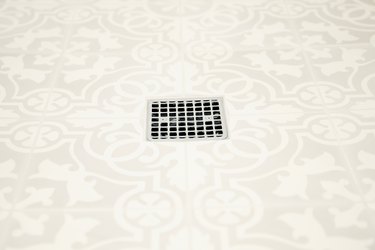
The Oatey 42150 and other drain assemblies like it consist of seven parts. The main part is the drain flange itself, which has a 2-inch, male-threaded outlet that fits snugly over the drain pipe when you drop it through the shower drain opening. A rubber gasket goes inside the flange housing and gets forced between the waste pipe and the housing by a large locknut. The entire assembly is held on from underneath by a second locknut, and the seal is completed by a fiber and rubber washer that you install between the locknut and the shower base. A stainless steel strainer that snaps onto the drain opening completes the parts list.
Once water gets past the shower drain, it continues through the P-trap to the drain line. Unlike P-traps for sinks, which are accessible and are assembled with removable compression fittings, traps for showers are not accessible and therefore must be glued together to ensure leak-free connections.
Repairs You Can Make Without Replacing the Shower Drain
When a clog occurs in the shower waste line and you can't loosen it with a plunger, you can usually remove the strainer by simply wedging a flat-head screwdriver underneath the edges and popping it up, although you might have to remove a set screw first. This exposes the entire drain opening so you can feed in a snake to break the clog or use a combination of baking soda and vinegar — a widely used homemade remedy for clogged drains — to loosen it.
Inside the flange housing, you'll see the locknut and rubber gasket sealing the opening of the waste pipe, and if the drain is leaking, you may be able to stop the leak by replacing the gasket. To do this, loosen the locknut by tapping on one of its notches with a hammer and screwdriver, unscrew and remove it and then pry out the old gasket and replace it and the locknut.
If that doesn't stop the leak, it's probably because the other locknut — the one holding the drain assembly to the shower pan — isn't tight enough or has corroded. To make a secure repair, it's best to replace the entire shower drain. Before you tackle this job, you should verify that the leak is actually coming from the drain. It may be coming from a loose pipe joint or from a hole created by a nail that was driven through the floor or the wall.
How to Remove and Replace a Shower Drain
Step 1: Expose the Underside of the Shower Pan
You need to make a hole in the ceiling drywall underneath the shower that is large enough to allow you to disassemble the drain. If the drain has been leaking, you'll know where to cut because the drywall underneath the shower drain will be soggy, and water may even be dripping. Be sure to remove all water-damaged and moldy drywall.
Make a rectangular hole, which is easier to patch than any other shape, and extend it at least as far as the ceiling joists on either side, cutting down the middle of the joists to provide a backing for the new drywall. Make the cuts with a drywall saw and utility knife and be watchful for other pipes and wires that may also be in the ceiling.
For electrical safety, it's a good idea to turn off the circuit breakers that control lights and outlets in the room in which you're working and to wear a headlamp for light until you know where all the wires are located.
Step 2: Disassemble the Part of the Drain Inside the Shower
Wedge a flat-head screwdriver under the drain strainer and pry up the strainer. Remove it to expose the locknut and gasket inside the drain flange. Note that the locknut has several crowns. Place a screwdriver against one of the crowns and tap the screwdriver with a hammer to turn the nut counterclockwise. Keep tapping until the nut is loose enough to turn by hand and then unscrew and remove it. Pry out the rubber gasket underneath it with the screwdriver.
Step 3: Unscrew the Drain Locknut from Underneath the Shower
Go back into the room underneath the shower and locate the locknut holding the drain to the shower pan. If enough space is available, you can loosen this with wide-jaw pliers, but if space is limited, use the same technique you used to remove the locknut from inside the drain, which is to tap one of its crowns counterclockwise with a screwdriver and hammer until the nut is loose enough to turn by hand.
Once you've removed the locknut, you should be able to remove the drain housing from the shower pan by lifting it out. If it's plastic and it won't come out, it's probably glued to the waste pipe, which means you have to cut the pipe to remove it. Rather than trying to do this at the connection point, which is difficult in cramped quarters even with a reciprocating saw, it's usually easier to cut the P-trap assembly at the trap outlet, lift the drain from inside the shower and cut it free from there. This means you'll have to replace the P-trap, but it guarantees a cleaner final assembly than trying to glue a short extension onto a pipe that's difficult to reach.
Step 4: Prepare the Waste Pipe for the New Drain Assembly
Wipe the rim of the waste pipe with a rag to clean off stray putty or debris and then slide on the locknut for the new drain followed by the fiber gasket and the rubber gasket in that order. You'll probably have to pull the pipe away from the drain opening to get these parts on, so make sure to return it to its original position when you're done.
Step 5: Install a New Drain Flange
Clean old plumbers' putty from the shower drain opening to prepare it for the new drain. Check the shower floor around the drain opening for cracks that may have been concealed by the old drain. Stop if you see any because you need a new shower pan.
Pack the underside of the rim of the new shower drain flange with plumbers' putty by rolling the putty into a rope, winding the rope around the flange and flattening it with your fingers. Some plumbers recommend using silicone caulk to seal the flange, but remember that silicone is an adhesive, so if you have to replace the drain in the future, you could have a tough time removing the flange. Drop the flange into the drain opening, fitting the flange around the end of the waste pipe.
Coat the rubber gasket and locknut that go inside the drain flange with plumbers' grease. Insert the gasket and push it down into the gap between the waste pipe and flange interior and then screw on the locknut. Tighten the locknut with the flat bar that came with the drain by dropping the bar into notches on opposite sides of the drain opening, inserting a flat-head screwdriver into the slot in the middle of the bar and using the screwdriver to turn the nut. Keep tightening until putty or caulk stops oozing from underneath the rim of the flange and then wipe off excess caulk or putty with a rag.
Step 6: Secure the Drain to the Underside of the Shower Pan
Working from the room underneath the shower, slip the two gaskets over the threads of the drain flange and then screw on the locknut. Tighten it as much as you can by hand and then finish the job using wide-jaw pliers or the hammer and screwdriver method.
If you had to cut out the old drain and you removed the P-trap, assemble the pieces you need for the new P-trap and glue them together. Pack the drain flange with plumbers' putty, feed it through the hole and go downstairs to slide on the fiber and rubber washers and screw on the underside of the drain fitting. Once the drain is assembled, you can glue the P-trap assembly to the shower drain and the drain line.

Step 7: Check for Leaks
Snap the strainer onto the drain flange and then turn on the shower faucet and let the water run for a few minutes while you go downstairs and watch carefully for dripping water using a flashlight. If you see any water dripping or beading, tighten both locknuts until the water seepage stops.
Step 8: Patch the Drywall
Cut a piece of drywall that fits in the hole, screw it to the ceiling joists with drywall screws and then tape and finish the joints with drywall tape and drywall joint compound. It usually takes at least three coats of joint compound to make a smooth repair. After the compound dries, reproduce the ceiling texture using one of the techniques mentioned by Don Pedro or use another technique. Prime and paint the patch or, for a more seamless repair, paint the entire ceiling.