
A casual lunch opens up your options for socializing with friends. A casual lunch with friends means you spend time with people whose company you enjoy without having to worry about scripted invites, fancy decorations or elaborate table settings. Instead, you're free to focus on conversation and fun while sharing a meal together.
Phone Calls
If you're inviting a close group of friends to your lunch gathering, a simple phone call is a quick and easy way to let them know the details. Write down the date, time and place of your lunch and keep it near the phone as you call your friends so you don't mistakenly give out incorrect information. Let guests know the event is casual so they can dress appropriately. It's also a good idea to let them know if kids are invited and what the menu includes.
Electronic Invitations
It's acceptable to send electronic invites to a casual lunch.You can design an eye-catching invitation with an appealing picture, font and color scheme. Input the event's information, check to make sure it's correct and press send. Many online invitation sites make it easy to send the invite to a list of people at once and keep track of acceptances and regrets so you can plan table settings and the amount of food you'll need to order or prepare. Electronic invitations are environmentally friendly because they don't produce waste, and many are free, which cuts down on the costs of your event.
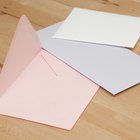
Paper Invitations
If you prefer sending paper invitations, even for a casual affair, you can indulge yourself without making the event too formal. Print the invitations on plain, white paper, cut them out and glue them to scrapbook paper that reflects the theme of your lunch. Include the time, date and place of the lunch and phone number for responses. Add embellishments with ribbons, small stickers or a photo. Place each in an envelope, add the address and pop it into the mailbox. Be sure to send your invitations a couple of weeks prior to the lunch so your guests can plan for the event.
Invitation Ideas
No matter what type of lunch invitation you use, putting it together is part of the fun. Consider a picnic theme. Use red and white checked paper or a digital background to mimic a tablecloth. Add tiny ant stickers or clip art, a picnic basket and a glass of lemonade. Write or type the invitations in black letters. For a holiday lunch, use a background with small, coordinating images, colored letters and holiday-inspired stickers and embellishments. You can extend these ideas to casual lunch events for graduations, baby showers and weddings as well.
Related Articles
Ideas for Invitations to a Red Carpet ...

Invitations to Make & Print at Home for ...

Ideas for Black and White Party ...

Ideas for Diamond Party Decorations

Ideas for a Vegas Theme Party
How Soon Do You Send Out Baby Shower ...
Formal Birthday Party Ideas

How to Decorate a Restaurant for a ...

How to Plan a Black & Silver Theme Party
How to Make Professional-Looking ...
How to Print Wedding Enclosure Cards

Ideas for a Hoedown
How to Make Cheap Wedding Tablecloths

Menu for a Ladies' Lunch

How to Address Rehearsal Dinner ...

How to Send Birthday Wishes on Facebook
The Standard Size for Wedding ...

How to Make Biodegradable Confetti

Cute Ideas to Display Napkins & Cutlery

How to Address Bridal Shower Invitations
References
Writer Bio
Eliza Martinez has written for print and online publications. She covers a variety of topics, including parenting, nutrition, mental health, gardening, food and crafts. Martinez holds a master's degree in psychology.
Photo Credits
Digital Vision./Digital Vision/Getty Images