Tree branches provide a free and decorative material for creating garden fences. Wattle fences, made by weaving branches, are sturdy and long-lasting. Use the branch fences to fence off a vegetable garden, create a decorative fence around a flower bed, to add privacy or as a trellis for climbing plants.
Branching Out
Video of the Day
Supple, whiplike branches bend and mold easily into a decorative fence. Although most green branches at least 6-feet long and 1 inch in diameter will work, wood from certain trees works better than others. Willow varieties, such as golden willow (Salix alba var. vitellina), a perennial in U.S. Department of Agriculture plant hardiness zones 2 through 9, provide long, straight, pliable branches suitable for fence-building. Collect branches from spring pruning and strip them of twigs and leaves before building the fence. Select sturdier, 1 1/2- to 2-inch-diameter or thicker branches for the fence posts.
Video of the Day
Sturdy Structure
Posts can be made from thick tree branches, 2-inch-thick fence posts or metal stakes. Posts need to be 10 to 12 inches taller than the desired height of the fence. Pound the posts 10 to 12 inches into the ground at 18-inch intervals for straight lines of fencing, or at 12-inch intervals around curves. If the posts require stronger anchoring, dig a post hole 2 inches deeper than the setting depth of the post and fill it with a 2-inch layer of compacted gravel. Stand the post in the hole and fill in around it with quick-setting concrete.
Working With Weaving
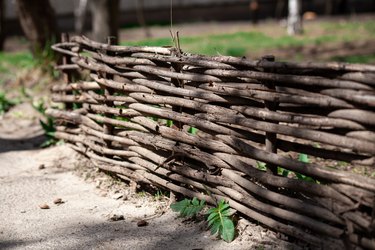
Decorative branch fences require repeated weaving of the long, pliable branches. Wear gloves to protect your hands while you work. Begin by weaving in the thicker branches, passing them over and under each post in the series. Alternate the weaving direction so some branches pass over the front of a post while others pass behind the post. As you weave, push down on the branches to pack them together. Alternating the bases and tips of each branch helps them fit together tightly. Fences made only with thicker branches will have more holes in them. This style works well for allowing dappled sunlight through or if the fencing is doubling as a plant trellis. For a sturdier, fully filled-in fence, use thinner branches to fill in the gaps between the larger branches.
Finishing Touches
Trimming off the overhanging ends of the branches to a uniform length at either end of the fence gives it a more finished look, but leave at least 3 inches of branches overhanging the last post so you can secure them in place. Loppers or pruning shears work well for trimming the branch ends. Installing a post cap at the top of each post makes it more attractive and helps keep the woven branches in place. Weaving hemp or jute twine through the overhanging ends of the branches on either side of the fence, and then tying the twine to the upright post, helps keep the woven branches in place so they don't come loose.