Grease is a byproduct of cooking that is comprised of animal fats and cooking oils. Because grease is not as dense as water, it floats on top of water instead of mixing with it. Grease that makes its way into the sewer system can wreak havoc on it by creating overflows and backups that lead to health hazards, damage to plumbing systems and even threats to the environment. Building a grease trap can help stop grease from entering the sewer system and safely store it so that it can then be disposed of properly.
What Is a Grease Trap?
Video of the Day
A grease trap is a device designed to filter kitchen wastewater before it enters the sewer system. Also known as a grease interceptor, a grease trap intercepts and captures fats, oils and grease (FOG) that are floating on the surface of the wastewater. Grease traps work by using a system of plastic wall structures to slow down and better control the water flow. Since FOG float to the surface, the grease trap fills from the top down as grease enters it, and any water that is free of grease exits from the bottom and into the sewer lines.
Video of the Day
Large commercial establishments involved in food preparation and sales typically use larger grease traps that are installed in the ground just outside of the kitchen area, but some grease traps are installed as under-the-counter containers.
Who Needs a Grease Trap?
Ideally, any kitchen where cooking with FOG occurs should have a grease trap. Private residences are not required to have a grease trap, but building a grease trap for your home can help protect your plumbing and the greater sewer system. Building a grease trap is a must for restaurants and some small businesses that prepare, store or serve food products to comply with local ordinances. City governments and local wastewater treatment agencies have strict policies and regulations about the amount of grease that can be legally released into the city's sewer system.
Every restaurant is required to have a grease trap, including bakeries and coffee shops because baking on premises or serving espresso requires the use of a grease trap. Some food establishments, however, like yogurt shops and ice cream stores, are not required to install a grease trap unless they make their own ice cream on site or serve baked goods or espresso.
Grease Trap Size Considerations
Grease trap size impacts capacity and cleaning requirements. When a grease trap is full, it must be emptied, which can be done manually or by using specialized equipment. Larger grease traps generally have a higher capacity than smaller ones. Knowing which grease trap size is right for you depends on your needs and local policies and regulations.
According to the Universal Plumbing Code, all grease traps should have a capacity between 20 and 55 gallons per minute. Grease trap size requirements for outdoor traps typically range from a minimum of 1,000 gallons to no more than 2,000 gallons for a single trap, though a series of grease traps can be used if more than 2,000 gallons is necessary. For under-the-counter grease traps, the capacity should be based on the number of fixtures discharging wastewater.
Types of Grease Traps
The three main kinds of grease traps include gravity, automatic and passive hydromechanical (manual). Gravity and automatic grease traps are usually found in restaurants, hotels and other places that require large installations. The passive hydromechanical grease traps are best suited for residential use. The manual, passive hydromechanical grease traps are ideal for home use because they are small, more affordable and have low maintenance costs. Grease traps are usually made of stainless steel or plastic and require occasional cleaning.
DIY Grease Trap for Kitchen Sink
If you don't want to invest in a manual grease trap but still want to do your part to prevent plumbing problems and avoid polluting the sewer system with waste from your kitchen, you might consider making your own DIY grease trap for the kitchen sink. By using a homemade grease trap, you can avoid pouring oils and food waste down the sink.
- Decide on where to keep your DIY grease trap. Under the kitchen sink is usually the ideal spot.
- Use an empty plastic gallon or any other plastic container with a lid.
- Using a funnel to avoid spillage, pour used cooking oils down the funnel and into the plastic container.
- Seal the container's lid to avoid unpleasant smells.
- When your container is full, ensure the lid is properly sealed and dispose of it in the trash.
- Place a new plastic container beneath your sink and repeat the process as needed.
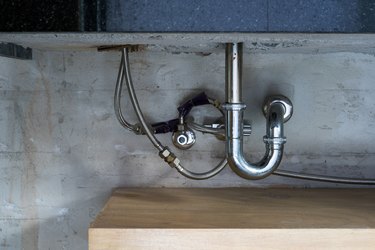
How to Install a Residential Grease Trap
Since it only requires basic skills, installing a grease trap is a relatively simple task for the average DIY homeowner. Make sure that your grease trap is installed in an accessible location since you will need to clean it out when it fills up.
- Decide on a location. The ideal place to install a grease trap in your home is beneath your sink because it is the most convenient spot and should be easily accessible for cleaning.
- Connect the grease trap. When installing any new device in your home, make sure to thoroughly read the manufacturer's instruction manual before starting. Grease traps generally have a total of three connections. Connect the first connection to the sink, the second one to the holding tank vent and the third one to the pipe that serves the sewage system. Plumbers usually suggest that you install a clean out tee before installing the second connection to the holding tank vent, but this is optional.
How to Clean a Grease Trap
Ideally, your grease trap should be cleaned at least once every three months, but you should never let it get more than 25 percent full at any given time. While it may not be a pretty job, cleaning your grease trap is relatively simple.
- Remove the lid. Using a pry bar, slowly and gently remove the lid of the
grease trap. It's important to be gentle when removing the lid because there is
a gasket beneath the lid that is prone to damage if the lid is removed quickly
or roughly.
- Create a grease trap diagram. Once you've removed the lid, take note of where each part of the grease trap is located. Creating a grease trap diagram can help you keep track of the trap's interior. Without a grease trap diagram for reference, it will be more difficult to properly re-install all the parts after cleaning.
- Measure the grease. Place a measuring stick in the trap and keep moving it down slowly until it reaches the bottom. Twirl the measuring stick to properly mark the grease level on to it. Remove the measuring stick and record how much grease is in the trap according to where it marked on the stick.
- Remove standing water. Use a small bucket to remove any standing water that you find within the grease trap.
- Empty the grease trap. Using a scoop or a small bucket, remove all the greasy sludge from the grease trap and place it in a heavy-duty plastic trash bag designed to handle liquids. Scrape all the grease from the lid and the sides of the trap.
- Clean your grease trap. Using a metal brush with soap and warm water, scrub down your grease trap and then rinse the screens and removable parts. Put the removable parts and the lid back in place when you are done rinsing.