

Kayaks are graceful and maneuverable on the water, but they can be awkward and inconvenient to store on land. Knocking together a quick kayak rack to hold them is an easy afternoon's DIY project, using either pipe or lumber. The finished stand can be used inside a shed or garage or outdoors near the water, whichever is more convenient.
A Very Basic Design
DIY kayak racks can take many forms, but the simplest is a box-shaped frame divided into sections for each kayak. As for materials, you have several options. PVC piping is available inexpensively in numerous sizes and is lightweight and easy to work with. Metal piping, such as the kind used for conduit or chain-link fencing, is heavier and more durable but also more costly. If you opt for metal, be sure to find the kind of fittings held together with screws or bolts rather than those that require welding. Wood is another easy option – relatively inexpensive and not difficult to work with.
Begin With Measurements
Start by measuring the length, width and depth of your kayaks. The length is determined by your shortest kayak, which should overhang the ends by at least 12 to 18 inches. The width and depth of the largest kayak, plus 6 or more inches in each direction, determine the size of the rack's sections. If you store your kayaks upside down, your rack will be relatively wide and flat. If you store them on their side, your rack will be relatively narrow and tall. You'll also need to decide how high the rack can be, depending on the height of the people using the kayaks, and how far off the ground you want your first kayak to be. Armed with those measurements, you can begin construction.
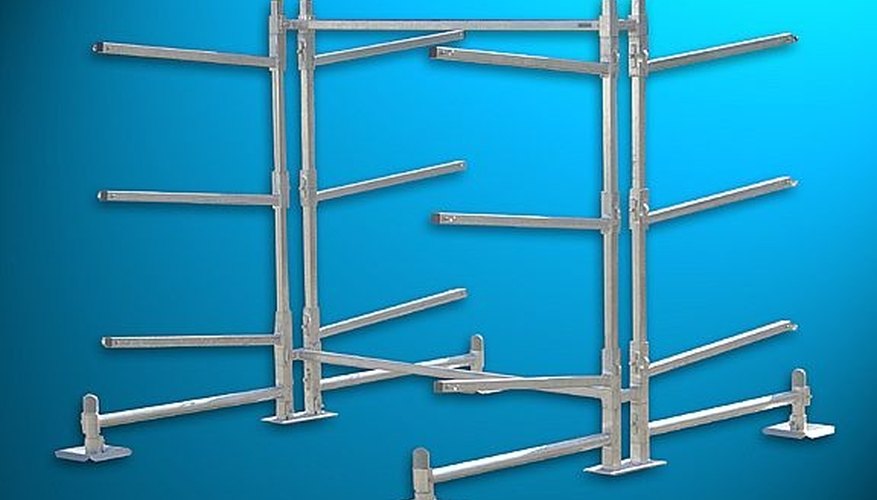
A Box-Frame Rack From Pipe
A simple box-frame rack made of plastic or metal pipe resembles the frame of a bunk bed, or a piece of construction scaffolding. Start by measuring crosspieces the width of your kayak plus at least an extra 6 inches on either side. You'll need two per kayak, or six for a simple three-craft rack. Put a T-shaped fitting at each end. Next you'll need the same number of sidepieces, shorter than your shortest kayak by 2 to 3 feet. Fit them with T connectors as well. To assemble:
- Start the uprights by cutting four pieces to whatever height off the ground you want your bottom kayak to be. Insert these into the four corners of your first two crosspieces.
- Cut 16 short pieces of 4 to 6 inches. Insert four of these into the top of the first crosspieces' T fittings. Put the first two long sides of the rack on top of these, sliding their T fittings on top of the short pieces. Your two sides and two crosspieces should now make a rectangular box, with the sides slightly higher than the crosspieces.
- Cut eight longer pieces to the depth of your largest kayak plus a few inches. Insert these into the top of the T fittings for the sidepieces. This completes your first tier.
- Repeat this process for the second tier, then finish the top with your remaining four short pieces. Attach cap pieces at the four top and four bottom corners.
A Box-Frame Rack From Wood
To build from wood you'll need 4-inch by 4-inch posts for the corners, or pairs of 2-inch by 4-inch boards nailed or screwed together to make the equivalent. They should be the full height you've calculated for your rack. The side and crosspieces will be 2-inch by 4-inch lumber. Crosspieces should be cut the width of your widest kayak plus a few extra inches of clearance, plus 8 inches representing the combined width of the uprights. Side pieces should allow your shortest kayak to overhang the ends by at least 12 to 18 inches. You can assemble the measured pieces by screwing or nailing them together.
- Start by laying out your four corner posts in a clear, level work area, and marking the height for each crosspiece and sidepiece. They'll attach to the inside of the posts, rather than the outside, and the crosspieces – which support the kayaks – will in turn be supported by the sidepieces.
- Lay out two of the corner posts on your work area, positioning the first sidepiece on its marks. Screw or nail it into place at each end, keeping the end flush with the outer edge of the corner post, then repeat with the remaining two sidepieces. One side of your rack is now assembled. Repeat for the remaining side.
- Have a helper hold each side of the rack upright, with the horizontal sidepieces on the inside. If you have only one helper, stand the other rack upright against a wall or post. Place a crosspiece across the two, at the lowest mark. Nail or screw it into place at each end so it's flush with the outer edge of the corner post and supported by the sidepiece beneath it. Now, do the same with the first crosspiece at the other end.
- Repeat for the remaining crosspieces until they're all in place and the rack is fully assembled.
A Few Bits of Finesse
If your rack will be used outdoors, it's helpful to set each corner of the base onto a deck block or flat paving block to keep it from sinking into the soil. You may also wish to protect the finish of your kayaks by padding the crosspieces of your rack. A split pool noodle works well with racks made from pipe, and stapling strips of carpet to a wooden rack will serve the same purpose. If you'll be using a wooden rack outdoors, it should be protected from the elements with paint or stain and sealer you'd use for your deck.
Expanding the Basic Design
The basic design described here can hold two to three kayaks, but can easily be expanded. The easiest option is to lengthen the crosspieces so that each accommodates two kayaks, positioned side by side and upside down. If you prefer a divider between the kayaks, make a third set of vertical posts using the same measurements. In what will now become the middle post, replace the T fittings with 4-way fittings. Install a new set of crosspieces between the middle posts and the third set of posts, attaching them to the new end posts. This doubles your capacity and requires only a bit more work.
References
Tips
- Make sure to sand the ends of all your PVC cuts to get any burrs off
Writer Bio
Fred Decker is a trained chef and prolific freelance writer. He grew up in rural Nova Scotia, and had learned to skin a rabbit with his pocketknife by the age of seven (whenever the pocketknife wasn't lost). He was educated at Memorial University of Newfoundland and the Northern Alberta Institute of Technology, and seldom loses a pocketknife anymore. You'll find his articles on game, foraged foods and other outdoor topics at major sites including eHow, Leaf.TV, Livestrong, OurEverydayLife and many others.