
Most people who need a wig would purchase one from a store or catalog. But it is possible to make wigs, including lace-front wigs, at home. These types of wigs are popular because they offer a more natural look than others. Purchasing one of these wigs can be expensive, which is why many take the time to make one themselves.
Measure the individual’s head with measuring tape. Place one end of the tape at the hairline, and pull it back across the head to the nape of the neck. Remove the tape measure, and place it just above the left ear, pulling the measuring tape over the head to the right ear. Measure every angle of the head to get the correct measurements. Write both measurements on a piece of paper.
Place a wooden wig block on the table or other flat surface. Nail cotton ribbons to the block using the measurements taken from the head. The ribbons will form an outline of the wig and should be the same size as the wig once it is completed.
Pull a wet cotton lace netting over the wig block so that it fits in the outline made with the cotton ribbon. Tack it to the block using straight pins. Repeat the same steps using nylon lace netting. Make sure both are securely pinned to the block.

Sew the two pieces of netting to the cotton ribbon outline using a sewing machine. Use a straight stitch, making sure all three pieces are secured to each other. Fit the cap on the individual’s head to see if any adjustments need to be made.
Select what type of hair will be used for the wig. Pull it through a hackle several times to sort it.
Place one drawing mat on the table. Lay the sorted hair on top of the mat. Cover the hair with a second drawing mat.
Knot the hair through the lace portion of the wig cap using a ventilating needle. Insert the needle through the cap starting at the hairline, making a loop with two pieces of hair. Pull the rest of the hair through the loop, making a knot. Repeat these steps with the remaining hair until the hairline is finished.
Decide the hairstyle for the wig. The same knotting technique used for the hairline will also be used to finish the rest of the wig. However, the direction of the hair will depend on the hairstyle. Cut the hair to the desired length once the remaining hair has been knotted into place.
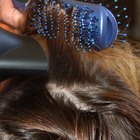
Remove the wig from the wig block. Brush an undercoat compound along the wig’s underside. Wait for at least an hour, and brush a second coat onto the wig. Wait about 24 hours until the wig is completely dry.
Related Articles

How to Make a Head Stand for a Wig

How to Re-Curl a Synthetic Wig

How to Apply Full Lace Wigs

How to Make Bangs With Glue in Hair ...
What Is a Capless Wig?
How to Sew on a Full Lace Wig

How to Make an Invisible Ponytail With ...
How to Blend a Lace Front Wig
How to Apply Lace Wigs With No Tape or ...
How to Braid Yaki Kanekalon Hair

How to Frame War Medals

How to Make a Hose Wig Cap
How to Make a Toupee
How to Reroot a Mannequin Head
How Were Colonial Wigs Made?
How to Put in a 27-Piece Hair Weave

How to Use Velcro Rollers So They Don't ...
How to Cut Bangs Into a Bob Wig

How to Glue a Weave on a Stocking Cap
How to Use Wig Tape