In residential electricity, a 230-volt circuit is virtually identical to a 240-volt or a 220-volt circuit. The different numbers are a reflection of the fact that the electricity that comes in from the power line, which is at 240 volts, experiences a voltage drop in the panel and the household circuitry because of resistance and other factors. A 230-volt breaker is therefore simply a conventional two-pole breaker. Installing one is simple, but it involves working in your main electrical panel, which is hazardous. Consequently, you may want to get an electrician to do the job.
Your Panel Has Two Legs
Video of the Day
The line transformer outside your house steps down the line voltage to 240 volts, and electricity comes from there to the panel in the form of two hot wires with that much voltage between them. Each one is a separate leg that attaches to a bus bar in the panel. The panel also has a neutral bus that returns to the transformer, making the voltage between each hot leg and the neutral bar 120 (or 115) volts.
Video of the Day
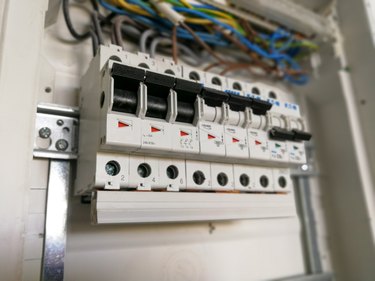
When you wire a conventional 120-volt circuit breaker to the panel, it has to contact one of these legs to make a circuit with that voltage. If you want 240- (or 230-) volt power for your stove or water heater, you need a breaker that contacts both legs of your panel. The breaker that does this is actually two 120-volt breakers. They're stacked together in an arrangement that allows each of them to contact a different bus bar.
Balance the Load
Because a double-pole breaker consists of a pair of single-pole breakers, you need two free adjacent slots on your panel to accommodate it. If you have two slots that aren't adjacent, you may be able to change the position of one of the existing breakers. When doing so, consider the load balance. The amount of power you draw from one leg in the panel should be roughly equal to the power you draw from the other one.
You can tell how much load you're drawing from each leg by looking at the positions of the breakers. Each adjacent breaker contacts a different bus, so one set of alternating breakers represents the total load on one bus while the other alternating set represents the load on the other bus. Try to distribute continuous loads, such as the refrigerator or freezer, to avoid overloading a leg, which can cause overheating.
Installing the Breaker
A 240-volt breaker should be sized according to the amperage needed to power the appliance. Stoves typically require 50 amps, while air conditioners may draw only 30 amps. The size of the wire also depends on amperage. Use 6 or 8 gauge for 50 amp circuits and 10 gauge for 30 amp ones. A 240-volt cable includes two hot wires – one black and one red – a neutral wire and a ground.
To install a two-pole breaker, attach the red hot wire to one of the terminals and the black wire to the other. Connect the neutral wire to the chrome neutral bus in the panel and the ground wire to the ground bus. Once all the wires are secure, snap the breaker into place. When fully seated, it contacts both hot legs of the panel, which makes the voltage in the circuit 240 (or 230) volts.
You should get an electrician to do this installation, but if you can't for some reason, be careful never to contact either of the hot bus bars with your tools. These bars are always energized, even when the main breaker is off. If you touch one with a tool, you could get a serious – even fatal – shock.