Have you noticed an increasing trend toward celebrating birthdays at restaurants? Well, there’s a secret to making it a special night and not “just” another night as a restaurant: Be a hostess. What does that mean? From choosing the venue to sending out invitations, act as if you are inviting guests to your home. Put thought and effort into it and it will make the evening a special experience for everyone. Here are some tips for throwing the perfect birthday party at a restaurant.
Picking the Venue
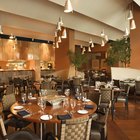
You don’t need to reserve a private room. Most restaurants are able to put together a table to accommodate groups ranging from six to twenty people. This leaves your options open since most restaurants do not have private rooms. Contact locations and see who will work with you to develop a set menu. Put together a three course meal (I love adding a cheese course at the end before dessert) and let the restaurant know that you will bring your own cake. Make sure to request that the table is setup at least a half hour before guests arrive so you have plenty of time to add your decor.
Invitations
For invites, you can go traditional or digital. For a small group of 6-12 people it doesn’t take too much effort to handwrite invitations and mail them, which is a nice touch these days since we really don’t receive many invitations in the mail anymore! If you want to go digital, my new favorite resource is Paperless Post. Their designs are adorable and have a reach-out-and-touch kind of feel to them.
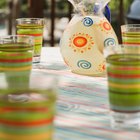
Table Decor
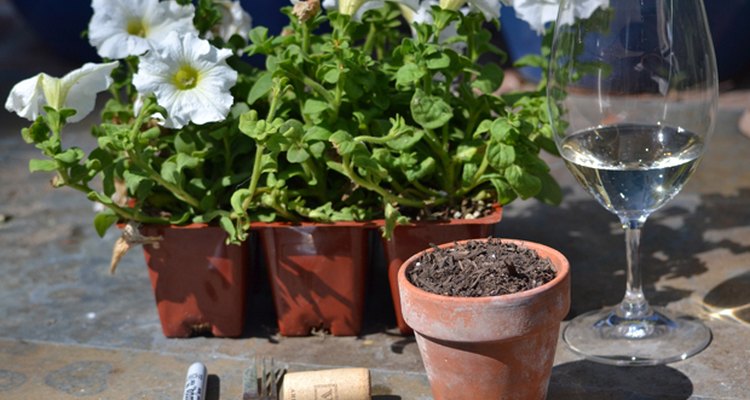
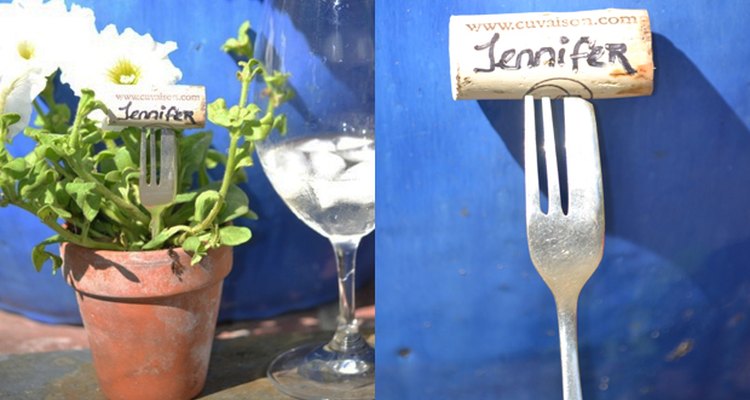
Here’s where you can really shine as a hostess! Order small arrangements from a florist or make them yourself using low vases (read my other blog post on how to create floral arrangements). Buy bunches of the same type of flowers and create a corridor of flowers down the center of the table, or if transportation becomes an issue, have a florist deliver one beautiful arrangement to the restaurant. Remember to ask them to keep it low and full. To ensure conversation flow, plan on using place cards. It may seem old fashioned, but it’s an added touch of formality that adds to the sense that the evening ahead is well thought through and planned to every detail. Here’s how to make simple floral place card holders (that double as party favors!).
1. Purchase small, inexpensive clay pots.
2. Buy a flat of flowers.
3. Plant small sections of the flowers in each of the pots.
4. Have a glass of wine.
5. Use the cork as the name tag. Write the attendee’s name on it using a permanent marker. Repeat.
6. Collect some forks from a local flea market or home goods store.
7. Put end of fork in soil and place cork on tines of fork.
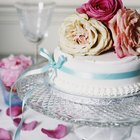
And don’t forget to bring your own candles! Usually restaurants have one per table and by bringing your own you’ll make the table extra special.
Be the Hostess
To create the atmosphere, greet guests as they arrive. Make sure they are served the signature cocktail for the evening and direct them to where they are seated. Throughout the evening it is your job as the hostess to make sure everything goes smoothly – from toasts to the birthday cake.
Party Favors
Party favors can be incorporated into stunning table decor or planned as a fun end-of-the-night treat. Here are some ideas for party favors:
- Small silver frames, each engraved with the attendee’s name (another place card that doubles as a party favor).
- Candles at each place setting.
- Funny gifts like made-for-tv items.
- Pretty memo pads with the initials of the birthday girl or guy. Quick tip: Wrap them in beautiful paper to match the flowers.
- Oversized and/or personalized stemware. Engraves names or sentiments look fantastic on any table and are a sweet keepsake from the dinner.
It’s a Wrap
When the party starts wrapping up, thank everyone for coming and provide them with their party favor packed in a special bag for them to take home. If all the details seem like a lot of work, share the hostessing job with a friend. Restaurant birthday parties really are a great way to entertain. And the best part? No cleanup!
Photo credits: Elizabeth Lamont
Related Articles

Ideas for a Cake & Punch Reception
Anniversary Dinner Party Menu
Gift Ideas Made From Wedding Invitations

How to Make a Barbecue Reception Elegant
How to Set a Table for Lunch

How to Make Confetti Quick & Easy

Favor Ideas for a 75th Birthday Party

How to Plan a Black & Silver Theme Party
How to Decorate a Restaurant for a ...

Ideas for a Vegas Theme Party

Budget-Friendly Wedding Appetizers

Surprise Anniversary Ideas

Ideas for an Elegant 40th Birthday Party
How to Garnish a Cake

What Things Will You Need to Have for a ...

How to Use Whipping Cream for Pancakes

How to Make Petit Fours
How to Cook Hot Roast Beef Sandwiches ...

How to Make a Special Night for Your ...
How to Run a Pancake Breakfast
Writer Bio
As a young New York fashion merchandising transplant, Liz started her foray into interior design when she launched a small interiors retail business in Santa Monica 25 years ago. Her relaxed, refreshing flair and natural design skills quickly caught the attention of celebrities & local trendsetters looking to capture the quintessential California style.