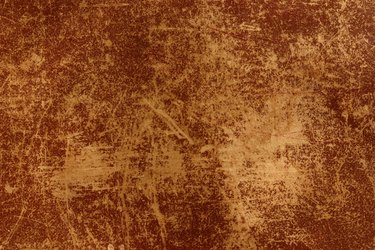
A faux leather finish is the perfect way to give just about any home furnishing the look of luxurious leather without the cost and in a totally animal-friendly process. Whether you're faux finishing a wall, a tabletop, or even an armchair, the key to achieving a leather look with paint lies in applying a dark leather-colored glaze over a lighter leather-colored paint. Tissue paper, plastic bags, or even newspaper quickly pressed onto and pulled off the wet glaze creates the illusion of texture and leatherlike color variations.
Prepping the Piece for Paint
Video of the Day
While it's tempting to dive right into the fun part, the leather faux finish turns out a lot better if you prepare the piece first. Let the material you're painting be your guide as to how to prepare it for paint. For instance, if it's a laminate side table or a wood table with an existing finish, sand all the paintable surfaces and dust them off. Vacuum any upholstery you wish to paint or dust and wipe down walls with a slightly damp cloth. If your project piece is plastic, wipe it down with a soapy cloth followed by rubbing alcohol or vinegar, which helps remove any greasy substances coating the plastic.
Video of the Day
For wood, laminate, or metal, apply a quality latex-based primer. Make sure the primer you choose works for your project material. A plastic-specific primer is a good choice if you're working with plastic, as some other primers won't adhere well. Whatever the surface, apply a coat of primer following the product label's instructions. Once that dries, apply another coat or two as needed or until you no longer see the original project material's color through the layers of primer.
Getting That Leather Look
A faux leather finish relies on at least two similar hues of latex or acrylic paint to create the worn, natural leather look. Shades of brown are ideal, such as a soft caramel hue for the base layer and a slightly darker chocolatey brown for the top coat, which is mixed with a glaze. If you aren't sure which colors to buy, look at images of worn leather and when you find one you like, get the nearest color matches for the darkest and lightest shades within the leather. Apply the lighter color as the base coat all over your project piece, allowing it to dry completely. If painting over fabric or over a bright color, it may need a second coat of paint.
Mix the darker paint color with an equal amount of glaze or up to three times as much glaze depending on the product label's recommendations. Feel free to mix it a couple different ways and experiment on a scrap piece of cardboard coated in the base paint color. Brush a fair amount of glaze over the project piece. If you're working on a large surface, such as a wall, work within a few square feet at a time to make it more manageable. While wearing rubber gloves, press a sheet of sturdy tissue paper or some crumpled plastic bags over the glazed surface and then lift off the material right away. Repeat the process all over the glazed area as much as necessary to achieve the desired effect.
Replace the tissue paper or plastic bag as needed when it becomes too messy. Anytime you don't like how the faux finish looks, feel free to brush over it with fresh glaze and try again, as glaze stays wet a little longer than paint on its own. If you feel the contrast is a bit too great where the dark and light colors meet, feather the edges of the dark glaze using a soft-bristled paintbrush and as light a touch as possible. Allow the glaze to dry completely before touching it.