
A topographical map shows the features of the landscape, including landforms like mountains, plateaus, lakes, streams and valleys. Contour lines drawn on the map indicate the elevation of natural features of the terrain. Making a 3-D topographical map provides kids with the opportunity to demonstrate their understanding of landforms and elevation with a hands-on activity. Although at first it may seem like a difficult task, when made with papier-mache, the project comes to life with little effort. Once the base is completed, a few final touches create an outstanding display that can be used as supplemental material in a geography unit.
- Poster board
- Pencil
- Enlarged topographical map
- Shredded paper
- Papier-mache paste
- Bucket/bowl
- Poster or tempera paint
- Paint brushes
- Fine tip marker
- Clear acrylic fixative spray

Enlarge the outline of the map to fit a large sheet of poster board. Copying the map on a transparency and projecting the image onto the wall with a projector is a quick way to create the appropriate size image. Simply trace the outline onto the poster board. You can also enlarge the image on a photocopier, cut it out and either paste it onto the poster board or trace the outline directly on the poster.

Add finely shredded paper to papier-mache paste and allow it to soak completely.

Locate landforms on the map you are using as a reference. Check the legend (the box at the bottom of the map that contains the symbols used on the map) of the map to determine the symbols used to indicate specific landforms like rivers, streams, hills, mountains and valleys. Determine the elevation of each landform by reading the contour lines on the map. Contour lines indicate the height of geological features and are generally written in feet. Mark landforms and elevations on the poster board with a pencil to create a guide for forming the papier-mache.

Squeeze small sections of papier-mache between your fingers allowing excess glue to drip back into the bucket and apply a thin layer of papier-mache to the entire map area. Build up areas of higher elevation using the contour lines on the original map as a guide. Mountains may need several layers of papier-mache to reach the desired height. Use your best judgment to simulate approximate height and keep landforms in proportion.

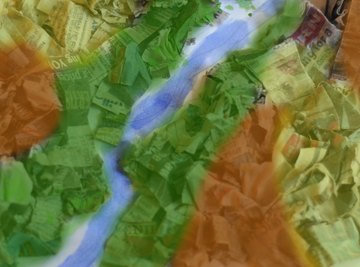
Duplicate the texture of the terrain by molding the papier-mache with your fingers. Make rough terrain like rocky hillsides by forming the papier-mache into irregular edges with your fingers. Smooth the papier-mache with your fingers for areas that are smooth or level. Create indentations for river or lakes by making indentations in the papier-mache with your fingers or other object like a pencil or dowel.

Place in an area where it will not be disturbed and allow to dry overnight. Check that all areas are completely dry. Depending on the amount of moisture in the papier-mache, temperature of the room and the thickness of mountains and landforms, it may take two days to dry.

Paint the map in the appropriate colors using blue for water, green for vegetation and brown for soil. Mixing or blending colors to create variations in the terrain of the map creates a more realistic appearance.

Allow to dry completely. Add labels with fine tip marker. Spray the map with clear coat of acrylic fixative to protect the surface and prevent wear.
Things You'll Need
References
About the Author
Nannette Richford is an avid gardener, teacher and nature enthusiast with more than four years' experience in online writing. Richford holds a Bachelor of Science in secondary education from the University of Maine Orono and certifications in teaching 7-12 English, K-8 General Elementary and Birth to age 5.
Photo Credits
Dale Davidson/Demand Media